22. Pictures you solve
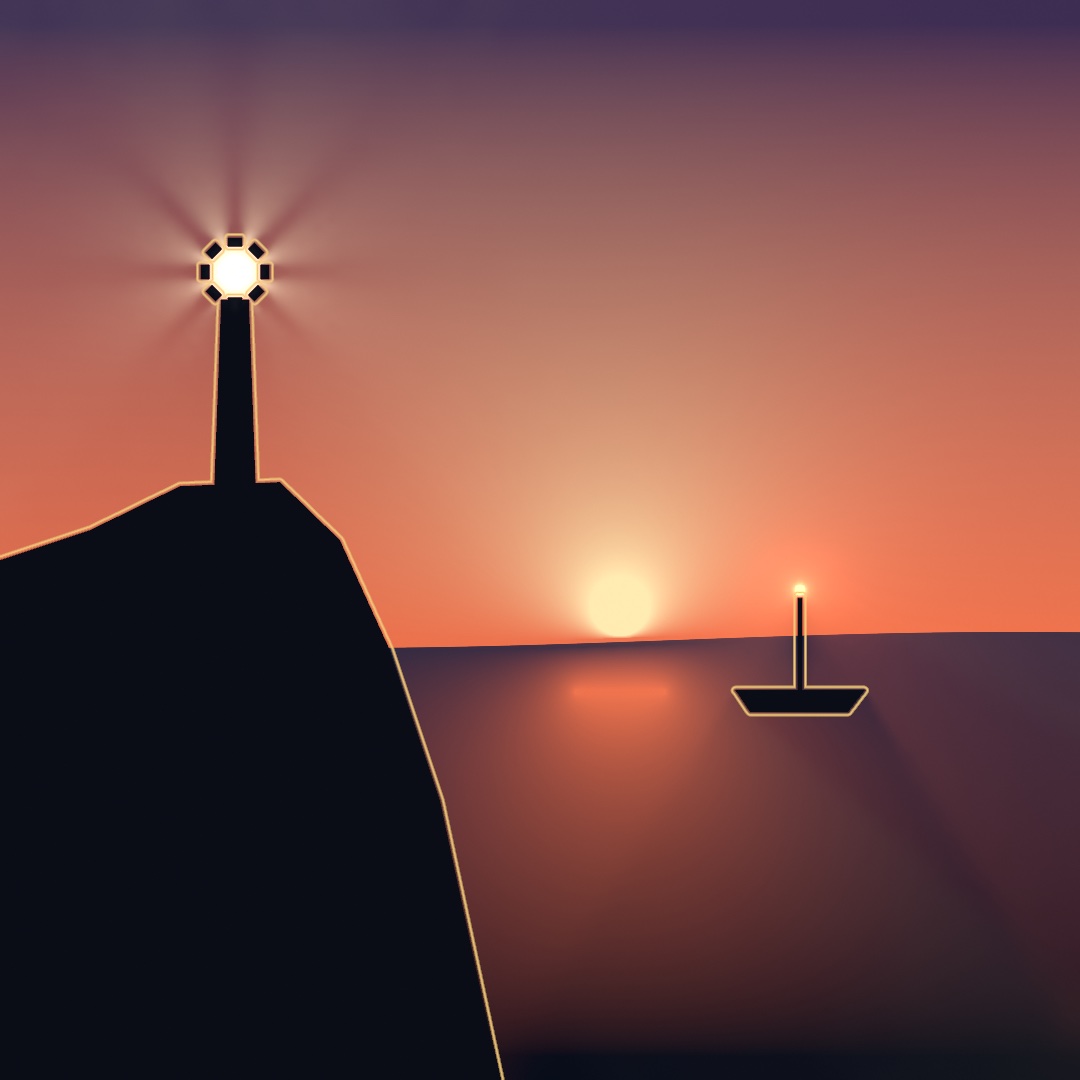
Some filters solve a problem instead of changing a picture. Diffusion paints from a few marks, a distance field measures every pixel against an edge, and light works itself out from its lamps. In the lighthouse above, the sky is diffused, the outlines are measured, and the beams are worked out. Past it, a pasted patch loses its seam and a picture is read as waves. A window's average costs the same at any size, and a layer gets an edge it was not drawn with.
A picture made of a few marks: diffusion
Every filter in Chapter 20 and Chapter 21 took a picture and did something to it. This one makes the picture.
Draw a few marks into a layer. .diffuse holds each drawn pixel as a color source and lets the color out into the empty space between them until it settles:
let marks = makeRenderTarget()
withTarget(marks) {
    drawDiffusionCurve(horizon, left: Color(hex: 0xE86F4A), right: Color(hex: 0x101A2E))
    noStroke(); fill(Color(hex: 0xFFE9B0))
    drawCircle(width * 0.7, height * 0.2, 26)
    fill(Color(hex: 0x2A3D66))
    drawCircle(width * 0.08, height * 0.08, 20)
}
drawImage(marks.filtered(.diffuse(sharpness: 1)).image, 0, 0)
The rule the solve follows matters, because everything the picture does follows from it. Away from the marks, every pixel ends up the average of its four neighbors. That is the rule a soap film obeys when you dip a bent wire in it. Nothing overshoots, no color appears that was not put there, and a mark's influence falls away smoothly in every direction at once.
drawDiffusionCurve is the form the technique is named for. It takes a list of points, which is what horizon holds in the listing above. It draws that path twice, a small distance apart, with a different color on each side. The field jumps across the curve and stays smooth everywhere else. Left and right are named from walking the path in the order its points come, so reversing the points swaps the colors.
Now compare it to a gradient, the usual tool for a smooth field. A gradient needs a direction and two ends. This needs neither. The shape of the field is decided by where you put the marks. That is why the third panel remakes the whole lower half of the picture with one added curve. You place a few colors and let the space between them work itself out.
Two arguments matter early. A pixel counts as a source when its alpha reaches threshold. A half-opaque mark pulls half as hard as a solid one, so a soft brush mark is a suggestion rather than a rule. And sharpness decides how much of the work happens at full size. Turn it down for speed while composing, and up when a thin mark's color must stay crisp right up to the mark.
A field you measure: the distance field
Diffusion treated the layer as something to be solved rather than something to be looked at. This step goes further and treats it as something to be measured, which is what the lighthouse's outlines are read from.
Draw your marks into a layer. Then ask every pixel in it a question: how far away is the nearest edge of anything drawn, and which way is it?
let field = marks.filtered(.distanceField())
That layer is no longer a picture. Its red channel holds the distance in pixels, running negative inside a shape and positive outside it. Its green and blue hold the direction to that nearest edge. A picture of a thing has turned into the measurement of where that thing is.
The two answers fit together into one line:
nearest edge = pixel + direction * abs(distance).fieldMap reads the field back as something you can see, by running the distance through a color ramp over a window you give in pixels. The middle panel above is one call, with bands a ramp of a few stops, dark at the edge and pale after it:
field.filtered(.fieldMap(bands, from: 0, to: 34, repeating: true))repeating wraps the ramp instead of stretching it. So the same colors come around every 34 pixels, and the marks carry contour lines like a map. Look at where two shapes meet in that panel. Their rings run into each other and stop along a crease. That crease is every place equally far from both, and you did not have to work it out.
Change the window and the same call does other jobs. A ramp that turns over at one distance grows the shape by that much, and shrinks it at a negative one. Here ink is the fill color you want:
field.filtered(.fieldMap(Ramp([ink, .clear]), from: 26, to: 27.5))That grows the shape, which image tools call a dilate. Blobs that were separate merge as they grow into each other, which is how you get a soft mass out of scattered marks. A ramp that is dark in a narrow band draws an outline at any offset you like, inside or outside. That is the lighthouse's outline.
The third panel is the direction channel doing its work. Each pixel walks to its nearest edge, steps a little past it, and brings back the color it finds:
float4 shade(float2 uv, ShaderInfo info) {
    float4 field = sampleRaw(info, uv);
    float2 here = uv * info.resolution;
    float2 inside = here + field.gb * (abs(field.r) + 4.0 * sign(field.r));
    return sampleAux(info, inside / info.resolution);
}
Every pixel ends up with the color of whichever mark is nearest to it. That is a Voronoi diagram, built out of the shapes themselves rather than out of a list of points. It costs one lookup per pixel. combined(with:_:) is filtered for an effect that reads a second layer, and .shader wraps a Shader as one, so the call is field.combined(with: marks, .shader(...)). The panel dims the territories and draws the marks back on top, so the shapes stay visible.
Metal note. A shader given two layers reads the first with
sampleRawand the second withsampleAux. It issampleRawrather thansample, the ordinary read of a layer, because the ordinary read hands a layer over as a color. A distance in pixels is not one.sampleRawgives you the stored numbers untouched.field.randfield.gbpick channels out of Chapter 18'sfloat4by letter, the red one and the green-and-blue pair.signis 1 or -1 by the sign of its argument, so the four-pixel step goes past the edge from either side.info.resolutionis the layer's pixel size, from the sameinfo.
One practical note is the cost. Measuring the whole canvas costs a few milliseconds. The measurement works outward in steps, and it needs one step per doubling of the distance it carries. When you only care about a band near the marks, say so and it gets shorter:
marks.filtered(.distanceField(maxDistance: 64))Past that distance the field reads flat, with a zero direction, which is its way of saying nothing is within reach.
Some uses of the field are common enough to have a filter of their own. Those are the layer styles: the outline, the shadows, the glows, and the bevel. They get an entry of their own at the end of the chapter.
Light that works itself out: .light
The measured field is the hard half of a bigger trick, and the trick is what throws the lighthouse's beams. Draw a scene into one layer and some lamps into another, and ask what light reaches every pixel.
let lit = scene.combined(with: lamps, .light())
drawImage(lit.image, 0, 0)
The base layer is the scene: whatever you draw there is solid, and its alpha is how much of a ray it stops. The aux layer, the second one combined(with:_:) takes, is the lamps: whatever you draw there gives light off, in its own color. What comes back is the light itself, which is why you draw it as the frame instead of over the scene.
Look at what nobody drew. The comb's four teeth throw four shadows, with light through the gaps, and the shadows fan out. Each is hard where it meets the tooth that casts it, and soft further down. A pixel further down can see more of the lamp. The light thins out with distance, and it thins out at the rate a lamp's does. In the third panel the red bar reddens the floor beside it and the green wall greens its own corner of the room. Those all come from one measurement.
The argument for that third panel is bounces:
scene.combined(with: lamps, .light(brightness: 5, bounces: 1))At 0 every surface stays black and only the lamps are seen. That is the middle panel, and a look you may want on its own. At 1, the default, light comes back off whatever it lands on, carrying that surface's color with it. Each further bounce costs another full pass of the solve, and more is softer.
sky and reach are the two arguments to know next. sky is the light arriving from beyond the reach of the field. A color there turns a dark room into a lit one with a window in it. reach is how far light travels in pixels, which is both an answer ("this is a small room") and the argument that sets the speed.
The cost needs saying plainly. This is among the most expensive effects in the chapter. A quality: argument sets how closely the light is measured, as .performance, .default, or .detail. At the default it costs about what diffusion costs, and at .detail far more. Its cost does not follow how much you drew. One lamp and two hundred cost the same, and so do ten shapes and ten thousand. What costs is the size of the layer and how far light may travel. If a sketch needs its frame rate back, draw the light into a half-size layer first (makeRenderTarget(scale: 0.5)), or pass quality: .performance.
Underneath, the answer is a ladder of light fields. Each one holds a single ring of distance around every point it samples. Close in there are many places and few directions; further out there are few places and many directions, over a span four times as long. That trade is why one lamp on the far side of the room costs no more than one beside you. The rays are walked against the measured field from the step above, each step as long as the distance the field reads there. That is why an empty room is crossed in a single step.
Putting it together: the lighthouse
The lighthouse is a harbor at dusk, and very little of it is painted. It composes the three steps above. A handful of marks diffuse into the whole sky and sea. Two lamps and a scene give back the light, with its beams and soft shadows worked out by .light. And every silhouette gets an outline read off its measured distance field. Make MySketches/Lighthouse.swift:
import Ollin

final class Lighthouse: Sketch {
    let night = Color(hex: 0x2A2350)
    let dusk = Color(hex: 0xE86F4A)
    let sea = Color(hex: 0x16233F)
    let deep = Color(hex: 0x080D1A)
    let sun = Color(hex: 0xFFE9B0)
    let land = Color(hex: 0x0A0D16)
    let rim = Color(hex: 0xF2C879)

    let lantern = Vector2(235, 272)

    override func draw() {
        let boat = Vector2(800, 700 + sin(time * 0.9) * 5)

        // The marks: a horizon warm above and deep below, a band of night at the
        // top, a low sun, and its path on the water. Diffusion fills in the rest.
        let marks = makeRenderTarget()
        withTarget(marks) {
            background(.clear)
            let horizon = stride(from: -20.0, through: width + 20, by: 12).map { x in
                Vector2(x, 640 + sin(x / width * 5 + time * 0.4) * 8)
            }
            drawDiffusionCurve(horizon, left: dusk, right: sea, width: 4)
            noStroke()
            fill(night)
            drawRect(0, 0, width, 24)
            fill(deep)
            drawRect(0, height - 24, width, 24)
            fill(sun)
            drawCircle(620, 606, 30)
            fill(dusk)
            drawRect(575, 690, 90, 4)
        }

        // The scene: everything the light meets. The shutter around the lamp
        // turns, and the gaps between its blades cut the light into beams.
        let scene = makeRenderTarget()
        withTarget(scene) {
            noStroke()
            fill(land)
            drawPolygon([Vector2(0, 1080), Vector2(0, 560), Vector2(90, 530),
                         Vector2(180, 486), Vector2(280, 482), Vector2(340, 540),
                         Vector2(390, 650), Vector2(440, 800), Vector2(500, 1080)])
            drawPolygon([Vector2(214, 490), Vector2(256, 490),
                         Vector2(249, 300), Vector2(221, 300)])
            for blade in 0 ..< 8 {
                let angle = time * 0.5 + Double(blade) * .tau / 8
                withState(at: lantern + Vector2(cos(angle), sin(angle)) * 30, rotation: angle) {
                    drawRect(center: .zero, width: 8, height: 13)
                }
            }
            drawPolygon([boat + Vector2(-65, -10), boat + Vector2(65, -10),
                         boat + Vector2(48, 12), boat + Vector2(-50, 12)])
            drawRect(boat.x - 2, boat.y - 104, 4, 96)
        }

        // The lamps: the lighthouse lamp, and a small one at the masthead.
        let lamps = makeRenderTarget()
        withTarget(lamps) {
            noStroke()
            fill(Color(hex: 0xFFF1C8))
            drawCircle(lantern.x, lantern.y, 12)
            fill(Color(hex: 0xFF7A50))
            drawCircle(boat.x, boat.y - 110, 6)
        }

        // The sky, then the silhouettes, then the light laid over both.
        drawImage(marks.filtered(.diffuse()).image, 0, 0)
        drawImage(scene.image, 0, 0)
        blendMode(.add)
        drawImage(scene.combined(with: lamps, .light(brightness: 6)).image, 0, 0)
        blendMode(.normal)

        // An outline a few pixels out from every silhouette, read off the field.
        let field = scene.filtered(.distanceField(maxDistance: 32))
        let band = Ramp([rim.withAlpha(0), rim, rim.withAlpha(0)])
        drawImage(field.filtered(.fieldMap(band, from: 1, to: 5)).image, 0, 0)
    }
}
The sketch builds three layers each frame and reads the picture out of them. marks holds the diffusion's sources. The horizon is a curve with dusk above and sea below. A band of night runs along the top, and deep water along the bottom. The sun and its path on the water are marks too. .diffuse() settles everything between them. The horizon's wave is part of the curve, so the sky and the sea swell with it.
scene does two jobs. .light reads it as the solid things that stop a ray, and .distanceField reads the same layer as shapes to measure. lamps holds the two lights. What .light hands back is the light alone. So the sketch draws the sky and the silhouettes first, and adds the light over them under Chapter 19's .add. Adding black changes nothing, so wherever no lamp reaches, the sky shows through untouched.
The beams come from the shutter. Its eight blades turn with time, and the gaps between them let the lamp's light out in spokes. Nothing in the sketch draws a beam. It is the comb from the room above, bent into a ring.
The outline is a fieldMap whose ramp runs from clear to gold and back to clear, over a window from 1 to 5 pixels. That lights a thin band just outside every silhouette, the mast and the shutter blades included. The field is measured again every frame, so the band follows the boat as it rocks on the swell.
Swift note. The horizon is built by
stride, which Chapter 14 used to make a list of levels. Here a.mapturns each x into a point.withState(at:rotation:)is Chapter 16's move-and-turn scope, so each blade is drawn at its own place around the lamp.drawRect(center:width:height:)places a rectangle by its middle, andrim.withAlpha(0)is Chapter 9's way to make a color transparent.
Then make it yours:
- Put the sun on the pointer. Its disc is a mark like any other, so
drawCircle(mouseX, mouseY, 30)in its place re-solves the whole sky around wherever you point. - Chart the water. Measure a second field out to a
maxDistanceof 120, and map it withrepeating: trueover a window of about 18 pixels. It rings the boat and the headland like ripples on a map. - Give the land a color. Fill it a dark green instead of near-black, and with the default single bounce the light that lands on the headland comes back green.
The lighthouse is about motion, since the beams sweep and the boat rocks on the swell, so keep it as a movie. swift run OllinLive MySketches/Lighthouse.swift --export-video lighthouse.mp4 --seconds 16 writes sixteen seconds of it. An export raises the light to its detail quality, so the file takes longer to write than the window takes to draw.
Other problems a layer can solve: a seamless paste, the frequency domain, local averages, and an edge of its own
The lighthouse solved three problems: colors settled between a few marks, distance measured from every silhouette, and light traced from lamps. Four more filters treat a layer the same way, as a problem rather than a picture, and none of them is in the lighthouse. The first settles a pasted patch into its new picture the way diffusion settles a color. The second reads a picture as the waves that add up to it. The third answers any window's average at a flat price. The fourth gives a layer an edge it was not drawn with, read off the field the second step measured, and a band of light that runs around it. Each entry here is the short form, and its reference page carries the rules and the costs.
Putting a piece of one picture into another: .seamlessClone
.seamlessClone drops a patch from one picture into another without its seam. It is for a slab of texture, a cut-out, or anything from elsewhere that would otherwise read as pasted. The rim gives a paste away, and so does the color, since the patch was lit differently wherever it came from. The method is the Poisson image editing that Patrick Pérez, Michel Gangnet, and Andrew Blake published in 2003. It is the diffusion from the first step under another name. Around the rim it measures how far the patch's color sits from the backdrop's. It spreads that difference across the inside as smoothly as it can, and adds it back. The rim lands on the backdrop, and only the slow, low part of the patch's color is replaced, so the stones survive:
let backdrop = makeRenderTarget()
withTarget(backdrop) { drawImage(wall, 0, 0) }

let patch = makeRenderTarget()
withTarget(patch) { drawImage(stones, 240, 180) }   // transparent everywhere else

drawImage(backdrop.combined(with: patch, .seamlessClone()).image, 0, 0)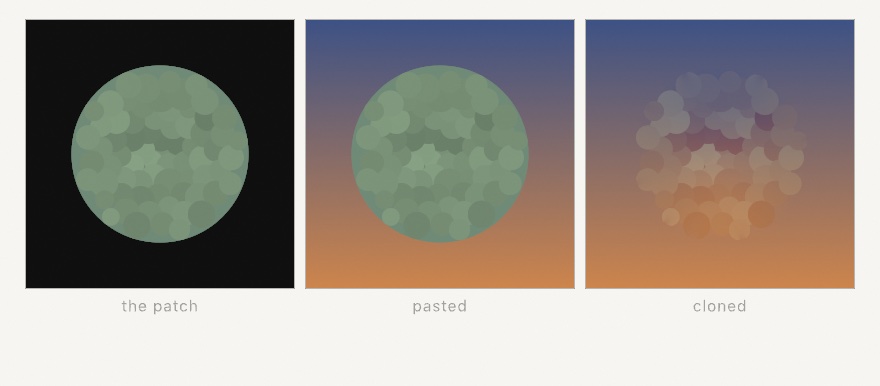
Where the patch layer is opaque is where it lands, so the shape you draw is the shape that gets cloned. amount runs from 0 to 1. Zero leaves the seam in, which is the picture you want beside it when you are deciding whether it worked. The Effects page has the two limits: a patch keeps its own range of tone, and a rim must stay off a hard edge. Examples/Effects/SeamlessClone does the paste live.
A picture read as waves: the Fourier transform
A grid of pixels is one reading of a drawing. A sum of waves is another, and the two hold the same information. The Fourier transform is how you get from one to the other. It is for the jobs that are awkward on the pixel side and easy on the wave side. Those are filtering a picture by scale, and making a field out of a spectrum. The idea is Joseph Fourier's, read to the Paris Institute in 1807 and published in 1822. The fast form every computer runs is James W. Cooley and John W. Tukey's, from 1965, and in Ollin it runs on the GPU:
let spectrum = plate.filtered(.fourier())
drawImage(spectrum.filtered(.spectrum()).image, 0, 0)   // the view of it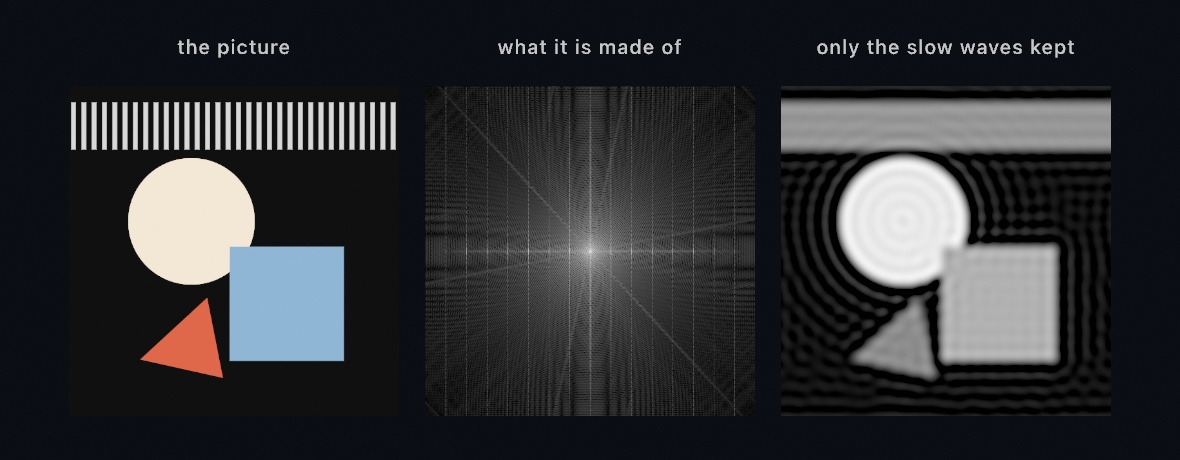
The middle panel is the spectrum, drawn through .spectrum(), the view that makes its faint values visible. It is a map of the drawing's scales rather than a picture of the drawing. Slow, wide gradients sit near the middle and fine detail out at the edges. The stripes are a comb of evenly spaced points along the middle line. Filtering by scale is awkward on the pixel side and a multiplication on this side, so a shape drawn over the spectrum is a filter:
let soft = plate.filtered(.fourier())
    .combined(with: mask, .mask())     // white circle in the middle of a black layer
    .filtered(.inverseFourier())
Keep the middle and the fine detail is gone, which is the third panel, where the stripes become one flat band. Invert the mask and only the edges are left. A ring keeps one band of scales and drops both the coarse and the fine, which no ordinary blur can do. The reference has the three rules: a square layer with a power-of-two side, one channel read, and a hard-edged mask that rings. It also has the other direction, a field written as a spectrum, which is how Chapter 30 makes an ocean. Examples/Effects/Fourier filters a picture by scale live.
Averages of a neighborhood, at a flat price: the summed-area table
The distance field asked every pixel how far away something was. Here is a different question, and a cheaper answer: what does the neighborhood around this pixel look like? The obvious way costs more the wider you look, 25 reads for a 5-pixel square and 250,000 for a 500-pixel one. Franklin C. Crow's summed-area table, from 1984, turns that into a flat fee. Every cell of the table holds the sum of everything above and to the left of it. The sum over any rectangle is then four lookups on its corners, wherever the box is and however big. Two filters stand on the table:
page.filtered(.boxBlur(radius: 400))             // costs what a radius of 4 costs
page.filtered(.adaptiveThreshold(window: 16))    // cut against each pixel's own surroundings
The first is the plainest blur there is, the average of the square around each pixel. Reach for it when the reach is large, or when the radius changes while the sketch runs. The second is the reason to build the table. .threshold(0.3) sends every pixel brighter than one number to white and the rest to black. The middle panel is what it does to a page under uneven light: no one number keeps the lit paper and the shadowed bands both. adaptiveThreshold compares each pixel with the average of its own surroundings instead, Derek Bradley and Gerhard Roth's rule from 2007. That is the right panel, where the text comes back through the shadow. The reference has the window rule, wider than the marks and narrower than the lighting, the bias fraction, and what the table costs. Examples/Effects/SummedArea runs both filters over a page.
An edge of its own: layer styles
Some uses of the measured field are common enough to have a filter each. These are the layer styles, the edge treatments a design tool offers a layer. There is an outline, a drop shadow and an inner shadow, an outer glow and an inner glow, and a bevel. They are for lettering and logos, for a cut-out that has to sit on its ground, and for any mark that wants a rim. Each reads the layer's alpha, so it follows letters and photographs as closely as shapes. The outline is a band cut from the distance field, a glow is a falloff read along it, and the bevel lights its slope. The two shadows blur the layer instead. Each is one filter, and they stack in the order they are chained:
let styled = marks
    .filtered(.bevel(width: 12, angle: -.pi * 0.75))
    .filtered(.outline(width: 5, color: .black))
    .filtered(.dropShadow(offset: Vector2(8, 10), radius: 14, color: Color(white: 0, alpha: 0.45)))
The order is the picture: here the outline is beveled with nothing, and the shadow falls from the outlined shape. An outline can sit inside, outside, or centered on the edge, and the bevel's light is an angle the sketch can turn. Layer styles has each filter's arguments, how exact the band is, and what each costs; Examples/Effects/LayerStyles stacks them on a word under a moving light.
Light running around an edge: the edge glow
The edge glow is a band of light hugging a layer's edge, with colored spots racing around the shape. It is the lit outline of a sign, a logo on a stage, or a button that is busy. The band is a glow read from the same measured field, brightest on the edge and fading over a width. Each color sends a few spots around it, placed by their angle around the layer's middle:
drawImage(word.filtered(.edgeGlow(width: 20, colors: [Color(hex: 0x7B2FF7), Color(hex: 0x00E0FF)],
                                  spots: 3, phase: time)).image, 0, 0)
Each color's light is added on its own, so where two spots cross they brighten rather than mixing to mud. The brightest overlaps turn toward white. The colors run alternate ways, and phase: time keeps them moving. The light is laid over the layer as emitted light, so it never darkens a pixel. The reference has the pulse, the bloom, and why a shape that crosses its own middle glows evenly there. Examples/Effects/WipesAndCopies runs it on a word and a star.
Where this comes from
Each of the lighthouse's three steps solves a problem somebody published. Diffusion curves are Alexandrina Orzan, Adrien Bousseau, Holger Winnemöller, Pascal Barla, Joëlle Thollot, and David Salesin's, from 2008. The measured field floods the layer by Guodong Rong and Tiow-Seng Tan's jump flooding, from 2006. The light rebuilds Alexander Sannikov's radiance cascades, from 2024.
The entries after the lighthouse name their own sources. The seamless paste is Pérez, Gangnet, and Blake's Poisson image editing from 2003. Its correction settles by the convolution pyramids of Zeev Farbman, Raanan Fattal, and Dani Lischinski, from 2011. The waves are Cooley and Tukey's fast Fourier transform from 1965. The local averages stand on Crow's summed-area table from 1984, with Bradley and Roth's adaptive threshold from 2007 on top of it. Full credits are in the project's attribution notes.
Go deeper
- Diffusion and the seamless paste:
.diffuseanddrawDiffusionCurvewith their arguments, and what.seamlessClonekeeps and where its rim should sit. - Measured distance fields: what the field holds, reading it back, and the jump flood underneath it.
- The frequency domain: the transform both ways, filtering by scale, building a field from its spectrum, and what the ladder costs.
- Layer styles: the six filters, where an outline sits, how exact the band is, and what each one costs.
- Light in a flat sketch: the two layers, every argument, the cost at each quality tier, what it will not do, and the ladder underneath it.
- Local averages: the box blur, the adaptive threshold, choosing the window, and what the summed-area table costs.
- Worked examples:
Examples/Effects/DiffusionCurves,Examples/Effects/SeamlessClone,Examples/Effects/DistanceField,Examples/Effects/Fourier,Examples/Effects/Light,Examples/Effects/SummedArea, andExamples/Effects/LayerStyles.
Contents · Previous: Chapter 21, Glass, chrome, and tape · Next: Chapter 23, Iterated forms