Depth compositing
In a 3D frame, 2D drawing composites over everything by default. That is right for a HUD or a caption. It is wrong for a label or a sprite that lives in the scene. That kind of mark should be hidden when something passes in front of it. Depth compositing lets 2D drawing join the depth buffer. A 2D mark placed at a world depth then hides the 3D geometry behind it. Geometry in front of that depth hides the mark.
You opt in twice. A frame is only 3D once you set a camera, and 2D drawing only joins the depth buffer once you give it a depth. Everything else composites over the scene in draw order, exactly as before.
There are two kinds of scene to composite against. One is a 3D-camera scene, such as a point cloud you drew. The other is a depth-map scene, which is a depth feed such as a webcam depth model or an RGBDFrame. Both use the same depth buffer and the same occlusion rule. They differ only in how you set a 2D mark's depth. A 3D-camera scene takes a world point, and a depth-map scene takes a normalized value.
Contents
- Placing 2D at a world depth -
depth(at:),noDepth()(a 3D-camera scene) - Projecting a world point to the canvas -
project - From the canvas back into the world -
cameraRay(through:) - Billboards -
withBillboard(at:) - A depth-map scene -
drawDepthScene,depth(_:)(a depth feed) - A metric depth scene -
Camera3D.intrinsic,drawDepthScene(_:)(true meters) - How occlusion reads
- Notes
Placing 2D at a world depth
depth(at: worldPoint) sets the depth of the 2D drawing that follows to the depth of a world point in the active 3D scene. The mark then depth-tests against the 3D geometry. The mark is hidden where the scene is nearer, and it draws over the scene where it is in front. noDepth() returns to drawing over the scene, which is the default. Both calls are drawing state, so withState scopes them:
camera(.orbiting(target: .zero, radius: 5, azimuth: time * 0.3, elevation: 0.3))
drawPointCloud(cloud)

withState {
    depth(at: Vector3(0, 0, 0))   // sit at the origin's depth
    fill(.white)
    drawCircle(width / 2, height / 2, 40)   // occluded by any cloud point in front
}
depth(at:) sets only the depth, so the 2D mark still draws wherever its canvas coordinates put it. To place the mark at the world point on screen as well, project the point first, as the next section shows. You can also use a billboard, which does both.
The depth is computed against the current frame's camera, so it resets each frame along with the camera. Set it in draw() after the camera, the same way you set the camera itself. Without a camera the call does nothing, and 2D marks composite over the scene as before.
Projecting a world point to the canvas
project(worldPoint) maps a world point through the active camera to its position on the canvas, in points, with the origin at the top left. It returns nil when there is no camera or when the point is behind the camera:
if let p = project(Vector3(1, 0.5, 0)) {
    drawCircle(center: p, radius: 6)   // a 2D dot at the 3D point's screen position
}
Pair it with depth(at:) to draw a 2D mark at a 3D point with correct occlusion, or use withBillboard, which combines the two calls.
You can draw a projected label with one call. drawText(_:at: Vector3, size:color:align:) projects the anchor point and draws the string with the style given in that call alone. It skips the draw when the point is behind the camera:
drawText("sun", at: Vector3(0, 2.2, 0), size: 26, color: .white, align: .center)From the canvas back into the world
cameraRay(through:) is the inverse of project. It returns the world-space ray from the active camera through a canvas point, as an origin and a unit direction. That ray is how you get from a click to the 3D thing under it. You can march along it, intersect it, or hand it to a physics query:
if let ray = cameraRay(through: mouse) {
    let probe = ray.origin + ray.direction * distance
}
The rays of a perspective camera all start at its eye. The rays of an orthographic camera are parallel, and each starts on its view plane. The call returns nil when there is no active camera. It also returns nil for a depth-feed (intrinsics) projection, because that projection has no analytic inverse. The physics pickers (grabBody, body(under:in:)) use this same ray.
Billboards
withBillboard(at: worldPoint) { … } anchors 2D drawing to a world point. It moves the origin to the point's projected canvas position and sets the depth to the point's depth. So 2D drawing inside the closure, in local coordinates around that origin, lands at the point and composites with correct occlusion. The closure is skipped when the point is behind the camera.
// A numbered tag attached to a 3D point, hidden when the point swings behind the scene.
withBillboard(at: orbCenter) {
    fill(.white); drawCircle(0, 0, 14)          // local coords: (0,0) is the anchor
    fill(.black); textAlign(.center, .middle)
    drawText("\(i)", 0, 0)
}
It is a shorthand for project, translate, and depth(at:), scoped by withState. Use those pieces directly when you want only the screen position or only the depth.
A depth-map scene
The other kind of scene to composite against is not 3D geometry you drew. It is a depth feed: a color image paired with a depth map, from a webcam depth model or an RGBDFrame. drawDepthScene(color:depth:) draws the color image as the backdrop and writes the depth map into the depth buffer. So the scene hides 2D drawing that comes after it, and a nearer subject hides a mark behind it.
// `depth` is a gray map, white nearest by default.
drawDepthScene(color: cameraFrame, depth: depthMap)

// A mark at a normalized scene depth: 0 is nearest, 1 is farthest.
depth(0.5)
drawCircle(width / 2, height / 2, 40)   // hidden where the scene is nearer than mid
This needs no 3D camera, because the depth scene allocates the depth buffer on its own. A 3D-camera scene uses depth(at: worldPoint). A depth-map scene uses depth(_ t:) instead, with a normalized t where 0 is nearest and 1 is farthest. The map's depth is a relative range, not metric world units.
drawDepthScene fills the whole canvas by default. To letterbox the feed into a fitted rectangle, pass in: rect. Pass whiteIsNear: false if the map encodes far as white.
The color image and the depth map usually come from the same source, so they line up. That source is either a depth model run over a camera frame, or an RGBDFrame's color beside a gray image of its depth. The 3D/DepthOcclusion example places a field of discs at a draggable depth plane in front of a live webcam. Anyone who stands nearer than the plane hides the discs.
A metric depth scene
A normalized depth(_ t:) is enough to hide a sprite behind a nearer subject, but it cannot tell you how far. That is because t is a relative 0...1 value rather than a distance. When the feed comes from a true depth camera, such as a LiDAR iPhone, its RGBDFrame carries metric depth in meters. It also carries the lens intrinsics that took it. Build a camera from those intrinsics, and the whole scene shares one metric space. That space covers a drawn point cloud, the depth feed, and any object you place. So you can put something 1.5 m in front of the camera, and the feed occludes it at exactly that distance.
guard let frame = device.latestFrame else { return }       // an RGBDFrame (meters)

// A camera from the feed's own lens. A point cloud, the depth scene, and any
// placed object now live in one space measured in meters.
camera(.intrinsic(frame.intrinsics))

// The color picture as the backdrop AND the frame's metric depth written into
// the depth buffer (this overload takes the RGBDFrame, not a gray Image).
drawDepthScene(frame)

// A marker at a true world point (1 m ahead, 0.2 m up), hidden the moment
// something nearer than 1 m passes in front of it.
withBillboard(at: Vector3(0, 0.2, -1)) {
    fill(.white); drawCircle(0, 0, 24)
}
The key difference from the gray-map scene is how you place depth. Use depth(at: worldPoint) in real meters, or withBillboard, which projects the point and sets the depth. Do not use the normalized depth(_ t:) here. The same metric Camera3D drives both the feed's depth and the object's depth. Camera3D.intrinsic places the camera at the origin looking down −z, which is exactly where RGBDFrame.pointCloud(...) and unproject put their points. So a metric drawDepthScene and a drawPointCloud of the same frame land on top of each other. Move the camera's eye/target afterward to orbit a drawn cloud. Leave the camera at its default to keep it aligned with a depth-scene backdrop.
There are two practical notes. First, the metric overload needs a camera, because it reads the near and far planes that map meters onto the depth buffer. intrinsic is the matching camera. Without a camera the call does nothing. Second, it letterboxes the feed into the canvas by the feed's own aspect ratio. The picture is never stretched, whatever the canvasSize or the phone's orientation. The metric camera letterboxes to match, so placed geometry stays aligned with the picture, with bars where the aspect ratios differ. The metric mode (M) of the 3D/DepthOcclusion example floats a grid of markers at a draggable metric plane in a live LiDAR feed. Stepping nearer to the camera than that plane hides the markers.
How occlusion reads
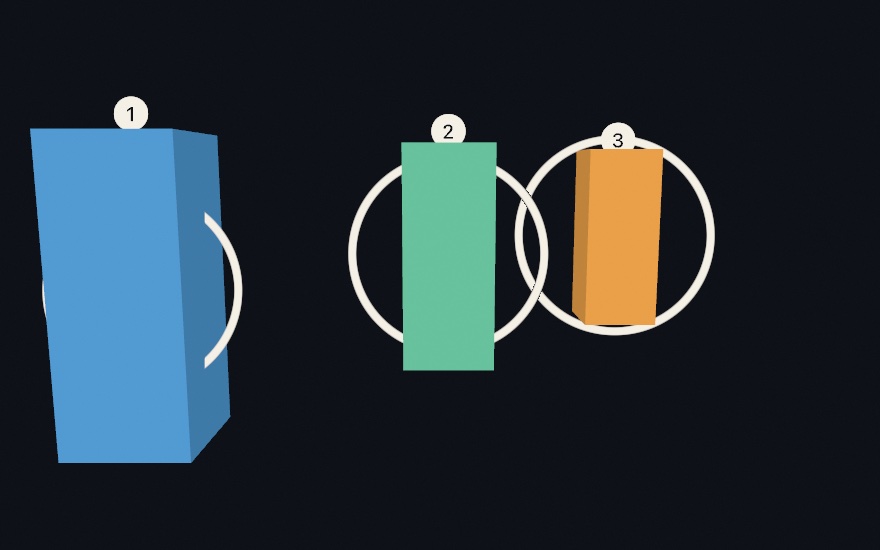
Occlusion follows the depth buffer and draw order. A 2D mark at depth d is hidden wherever nearer geometry has already written a smaller depth. The mark writes d itself, so it hides farther geometry drawn after it. The usual arrangement is to draw the 3D scene first, then the depth-placed 2D drawing over it. Take a near orb, a far orb, and a card at a depth between them. The near orb was drawn before the card, so it shows over the card. That is because the card's depth test fails where the orb wrote a nearer value. The far orb is hidden by the card. The opening figure runs the same test, with one ring per pillar. See the 3D/DepthCompositing example.
Notes
- The default is unchanged. A 2D draw with no depth set still composites over the 3D scene in draw order. A 2D-only frame with no camera is not affected.
- It applies to every 2D pipeline. Shapes, images, text, and particles all honor the depth, because they share the 2D vertex path.
- Point clouds have gaps. A 2D mark behind a sparse cloud shows through the gaps between splats. This happens because the depth test runs per fragment, and a gap still holds the far clear value. Denser clouds or bigger splats occlude more solidly.
- Same limits as 3D. The accumulation surface (
noClear) and the live texture hand-off (Syphon and the virtual camera) do not depth-sort yet. Keep depth-composited sketches on the live window and on the raster/PNG export paths.