Phone (iPhone sensor stream)
A sketch that renders on the Mac can use what an iPhone connected by a cable detects on the phone itself. The phone side is Ollin Capture, Ollin's own iOS app (Apps/OllinPhoneApp). The app runs ARKit on the phone's Neural Engine and streams the results over the USB cable. On the Mac, PhoneDevice reads them as typed values you use in draw().
Seventeen payloads come over the cable. The first is a 3D body skeleton. Next are faces, up to 3 at once, each a deforming mesh plus the 52 expression blendshapes. The hands in view come as up to 4 skeletons of 21 joints each, lifted to metric 3D where the phone has LiDAR. The lines of text the phone can read arrive with their corners lifted the same way. The pictures and objects it knows each arrive as a named 6DoF placement in the room, with the real size. A map of where the picture draws the eye arrives as a heat map with the regions where it peaks. How the picture is moving arrives as a field of motion vectors between consecutive frames, read the way the Mac's own optical-flow field is read. A world-facing RGBD depth frame from the rear LiDAR unprojects into a point cloud and carries the camera's 6DoF pose. The room mesh is the space itself, reconstructed as a labeled triangle surface. The flat surfaces in that room arrive beside it, as somewhere to stand something. The room's light reports how bright and how warm the space is. A person-segmentation matte from the rear camera comes as a silhouette and a cutout. Device motion streams too. The phone itself held as a pointer is the one payload that describes the person rather than the room. What the phone hears is every sound its classifier names, with how sure it is, from the phone's own microphone. The last two need no camera at all: every finger on its own screen, which turns the phone into something you play, and the air it is standing in, read off its barometer.
Traffic runs the other way too. The sketch can say which mode to run and what to look for, sending the reference pictures down the cable, and the phone answers with what it is doing and what it made of them. A sketch can also put itself on the phone's screen. The Mac draws, the phone shows each frame, and the fingers on it come back as the pointer.
Record3D reads the color-plus-depth feed from another app. Ollin Capture is Ollin's own app, so the stream carries ARKit's own results, and both ends of the link are Ollin code.
PhoneDevice lives in a separate library, which keeps the drawing core small. Add import OllinPhone beside import Ollin. The transport is the standard usbmuxd device tunnel, the same mechanism Xcode uses. There is no third-party dependency and no Wi-Fi pairing, so the cable is the whole setup.
import Ollin
import OllinPhone

final class Pose: Sketch {
    let device = PhoneDevice()

    override func setup() { device.start() }

    override func draw() {
        background(Color(white: 0.05))
        guard let body = device.latestBody else {
            return drawStatus(device.waitingMessage, style: .info)
        }
        camera(.orbiting(target: body.center, radius: 2.6, azimuth: time * 0.4, elevation: 0.12))
        drawPointCloud(body.cloud())
    }
}
Contents
- Setup - install the capture app, connect the cable
- Reading the stream -
latestBody,latestFace,latestFrame,sceneMesh,planes,latestLight,latestMotion, the connection state - The body -
PhoneBody, the joints, drawing the skeleton, where the person stands, joints that turn - The face -
PhoneFace, the blendshapes, the mesh and its texture coordinates, the eyes and the gaze - The hands -
PhoneHand, 21 joints, the 3D lift,pinchDistance - The text in view -
PhoneText, the corners,worldTransform - The pictures and objects it knows -
PhoneMarker, the reference folder,placement - Saying what to look for, from the sketch -
look(for:),use(_:),PhoneReference,latestState - The phone as a pointer -
PhoneWand, the beam, the button, the thumb - World depth -
latestFrame,pointCloud(...), the camera pose - World fusion -
WorldCloud, sweeping a room into one cloud, keeping it registered, and recognizing a place already scanned withScanGraph - The room mesh -
sceneMesh, the room as a labeled surface, the Room mode - The flat surfaces -
planes, somewhere to stand something, no LiDAR needed - The room's light -
latestLight, how bright and how warm the room is - Segmentation -
latestSegmentationMatte,latestSegmentationCutout, the Segment mode - Where the eye goes -
latestSaliency, the heat map, the salient regions - How the picture is moving -
latestFlow, the motion field, read like the Mac's own - What the phone hears -
sounds, a level and a trigger for every sound the phone names - The screen as a control surface -
touches, every finger on the glass, and the taps you cannot miss - The sketch on the phone's screen -
show(_:),PhoneScreen, the Mac's frames on the glass and the finger as the pointer - The air around it -
latestAir, the pressure and how far the phone has risen - Device motion -
PhoneMotion, the transport smoke-test - Notes - the wire, coordinate space, what's ahead
Setup
On the sketch side you need only import OllinPhone and a PhoneDevice. The phone needs the capture app:
- Build Ollin Capture onto the iPhone. It is an xcodegen + Xcode project, because an iOS app cannot be run with
swift run. InApps/OllinPhoneApp, runxcodegen generate, open the project, select the phone, and press Run. The app needs an A12+ iPhone on iOS 17+ and automatic signing. That README has the device-registration step. - Connect the cable and launch the app. The screen reads READY until the Mac connects, and then it reads ON AIR.
- Run the sketch on the Mac.
PhoneDeviceretries on its own. So you can launch the app or plug in the cable after the sketch is already running, and the feed begins then.
The bundled example is swift run --package-path Examples Example-3D-Phone-PhoneBodyPose.
Reading the stream
PhoneDevice has the same shape as Record3DDevice: start() / stop(), a waitingMessage for the notice shown before the connection, and isRunning:
let device = PhoneDevice()
device.start()                       // begins connecting; safe to call once

device.isRunning                   // Bool, frames currently arriving
device.waitingMessage                // a notice reflecting the live connection state
device.latestBody                    // PhoneBody?, the tracked skeleton (Body mode)
device.latestBodies                  // [PhoneBody], every tracked body (= one today)
device.latestFaces                   // [PhoneFace], every tracked face, up to 3 (Face mode)
device.latestFace                    // PhoneFace?, the most prominent face (= latestFaces.first)
device.latestHands                   // [PhoneHand], every hand in view, up to 4 (Hands mode)
device.latestHand                    // PhoneHand?, the most confident one
device.latestTexts                   // [PhoneText], the lines it can read (Text mode)
device.latestMarkers                 // [PhoneMarker], the pictures it knows (Markers mode)
device.latestWand                    // PhoneWand?, the phone as a pointer (Wand mode)
device.latestSaliency                // PhoneSaliency?, where the eye goes (Attention mode)
device.latestFlow                    // PhoneFlow?, how the picture is moving (Flow mode)
device.latestFrame              // RGBDFrame?, the latest depth frame (World mode)
device.sceneMesh                     // PhoneSceneMesh, the room scanned so far (Room mode)
device.planes                        // PhonePlanes, the flat surfaces found (Room mode)
device.touches                       // PhoneTouches, every finger on the screen (Touch mode)
device.latestLight                   // PhoneLight?, how bright and how warm the room is
device.latestAir                     // PhoneAir?, the pressure and how far the phone has risen
device.latestMotion                  // PhoneMotion?, the latest device-motion sample
Each value is replaced each time the phone sends a new one, so read them within the current draw(). Each is nil until the first of its kind arrives. Motion usually arrives first, because it needs no camera or model. So it proves the wire works before ARKit has found a body, face, or depth.
The camera modes are mutually exclusive. Only one camera session runs at a time. Body, World, Segment, Room, Hands, Text, Markers, Wand, Attention, and Flow use the rear camera. Face and Selfie use the front camera. Touch runs no camera at all: the screen is the sensor there, so the phone stays cool. Sketch runs none either: the screen shows a sketch the Mac is running. The capture app has a mode toggle. Its positions are Body / Face / World / Segment / Selfie / Room / Hands / Text / Markers / Wand / Attention / Flow / Touch / Sketch. Only the selected mode updates its values. Those are latestBody, latestFace, latestHands, latestTexts, latestMarkers, latestWand, latestSaliency, latestFlow, latestFrame, and touches, each for its own mode. The segmentation images update in Segment and Selfie (both feed them), and the room's sceneMesh and planes update in Room. The other values hold their last reading, so read the value for the mode you mean to drive. Motion streams in every mode, and so does latestAir once the Air switch is on. latestLight streams in every mode except Selfie, Touch, and Sketch, the three that run no ARKit session.
The body
PhoneBody carries every reported joint as a 3D position in meters, in model space. In that space the pelvis root sits at the origin. ARKit's convention puts x to the picture's right, y up, and z toward the camera. The accessors have the same shape as Body3D and LiftedPose from OllinVision:
if let body = device.latestBody {
    body.isTracked                   // Bool, ARKit tracking vs. extrapolating
    body.position(.head)             // Vector3?, one joint, model space
    body.positions                   // [PhoneJoint: Vector3]
    body.bones()                     // [(Vector3, Vector3)], segments to draw
    body.center                      // Vector3, centroid, to aim an orbiting camera
}
The joints are the PhoneJoint set, a practical subset of ARKit's ~91-joint skeleton. It holds root, hips, spine, chest, neck, head, and the arms and legs out to the hands and feet. A joint ARKit did not report this frame is absent. The subset is deliberate. The camera observes only part of the full rig, and the rest of the rig exists to smooth a rigged mesh. Streaming those extra joints would add bytes and no information.
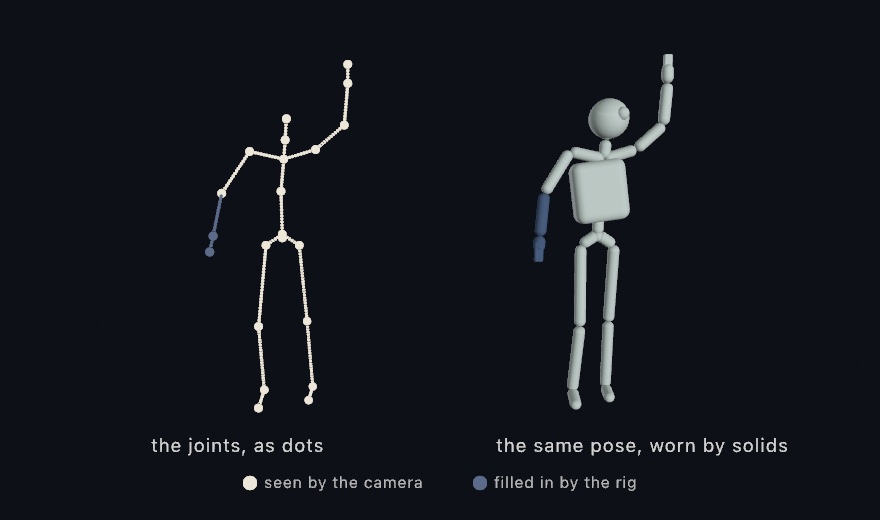
The lightest way to draw the skeleton is as a PointCloud. Each joint becomes a splat, and each bone becomes a dotted line of splats, exactly as LiftedPose.cloud does. For solid bones, draw capsules between the joints with drawCapsule(from:to:radius:):
camera(.orbiting(target: body.center, radius: 2.6, azimuth: time * 0.4, elevation: 0.12))
drawPointCloud(body.cloud(jointSize: 0.055, boneSize: 0.018, color: .white))

for (a, b) in body.bones() {            // or: solid bones
    drawCapsule(from: a, to: b, radius: 0.03)
}
Where the person stands
Model space keeps the root at the origin, so a figure drawn from position(_:) stays in place while the person walks. The body also carries its anchor's world transform, which maps model space to ARKit world space. That world has y up, is measured in meters, and has its origin where the phone's session started. The depth sweep, the room mesh, and the flat surfaces live in the same world, so a body and a scanned room combine directly:
body.worldTransform                  // simd_float4x4, model space → world space
body.worldPosition(.head)            // Vector3?, one joint, standing in the room
body.worldCenter                     // Vector3, the centroid in the world
drawPointCloud(body.cloud().transformed(by: body.worldTransform))
Joints that turn
Every joint carries its orientation beside its position, as a quaternion (x, y, z, w) in model space. modelTransform(_:) composes the orientation with the position, and worldTransform(ofJoint:) does the same and places the result in the room. Pass either matrix to transform(_:) to pose a solid part at the joint:
body.orientation(.head)              // SIMD4<Float>?, the joint's quaternion
body.modelTransform(.head)           // simd_float4x4?, orientation + position composed
body.worldTransform(ofJoint: .head)       // simd_float4x4?, the same, stood in the world

if let pose = body.worldTransform(ofJoint: .head) {
    withState {
        transform(pose)              // the head's full pose, one call
        drawSphere(radius: 0.11)
    }
}
The person's size, and what the camera saw
Each body carries two more readings. scaleFactor relates the person's estimated height to the default rig, where 1 is the default and a smaller person gives a smaller factor. A figure's parts can use it to size themselves to whoever steps in front of the camera. isObserved(_:) says whether the camera actually observed a joint this frame. The rig fills unseen joints in from their neighbors, and those joints report false. So a sketch can tint a guessed joint differently from an observed one.
latestBodies is the whole set. It is empty when nobody is in view, so a person leaving clears the sketch instead of freezing the last pose. ARKit follows one body today, and the list keeps the API ready if that number grows.
Two bundled examples use this section live. Example-3D-Phone-PhoneBodyFigure is a solid mannequin whose parts follow the joint orientations. It stands where the person stands, sized by the scale factor and tinted by the tracked flags. Example-3D-Phone-PhoneCostume puts a costume on the same skeleton: ribbon trails that the joints leave as they move, and plumage that twists with the joint rotations. It is a homage after Universal Everything's Super You, credited in its header. PhoneBody's init is public, so a pose can also be staged from a PhonePoseSample with no phone attached. That is how a test or a figure exercises the same drawing code.
The face
In Face mode the phone tracks faces on the front TrueDepth camera, up to 3 at once. Each face streams as a PhoneFace. A PhoneFace carries the 52 expression blendshapes and the deforming mesh with its texture coordinates. It also carries the head pose, the two eye poses, and the look-at point where the eyes converge. Read latestFaces for the whole set, or latestFace for the most prominent one only:
for face in device.latestFaces {     // up to 3 people
    face.isTracked                   // Bool, ARKit tracking vs. extrapolating
    face.blendShape(.jawOpen)        // Double 0…1, one expression coefficient
    face.blendShapes                 // [PhoneBlendShape: Double], all 52
    face.strongestBlendShapes()      // the few firing now, strongest first
    face.mesh()                      // Mesh, the triangle surface (draw solid/wireframe)
    face.meshPoints                  // [Vector3], the mesh vertices, face-local (meters)
    face.meshUVs                     // [Vector2], per-vertex texture coordinates
    face.headPosition                // Vector3, head position in world space
    face.headOrientation             // SIMD4<Float>, head rotation quaternion (x,y,z,w)
    face.headTransform               // simd_float4x4, both composed, for transform(_:)
}
latestFaces is the complete current set each frame, so a face that leaves drops out and the list shrinks. ARKit's order has no spatial meaning, so sort by headPosition.x if you want each face to keep a steady color.
The blendshapes are the PhoneBlendShape set, ARKit's 52 named coefficients: jawOpen, eyeBlinkLeft, mouthSmileLeft, browInnerUp, cheekPuff, tongueOut, and the rest. Each runs from 0 at neutral to 1 when fully expressed. Each coefficient is a single number, so they are cheap to read. Read one to drive a parameter, or call strongestBlendShapes() to name the current expression.
Draw each face as its mesh(), the triangle surface. The mesh carries the ARKit topology, computed normals, and the per-vertex texture coordinates. Draw it solid, textured, or as a wireframe(), which draws only the mesh's edges. The texture coordinates are the same mapping for every face, and they never change from frame to frame. So a mask image painted once (face.mesh().textured(maskImage)) fits every face and stays in place while the mesh deforms. The vertices are face-local and centered on the face. To place several people apart in space, add face.headPosition to each, then orbit their centroid:
// One face: face-local space, so orbit .zero
camera(.orbiting(target: .zero, radius: 0.42, azimuth: time * 0.4, elevation: 0.04))
wireframe()
drawMesh(face.mesh())
To stand the mesh where the head really is, turned the way the head turns, put face.headTransform on the transform stack instead. Then draw the mesh under it. face.cloud() draws the vertices as points, if you want the splat look. The bundled example is swift run --package-path Examples Example-3D-Phone-PhoneFace.
The eyes and the gaze
Each face also carries its two eyes and where they look. The eye poses and the look-at point are face-local, which means relative to the head. Each of these readers has a world-space version. It gives the same value placed in the room, using the head pose:
face.eyePosition(.left)              // Vector3, face-local (meters)
face.worldEyePosition(.left)         // Vector3, stood through the head pose
face.eyeOrientation(.right)          // SIMD4<Float>, quaternion, identity = straight ahead
face.gazeDirection(.right)           // Vector3, unit, out of the face
face.worldGazeDirection(.right)      // Vector3, unit, in the room
face.lookAtPoint                     // Vector3, where the eyes converge, face-local
face.worldLookAtPoint                // Vector3, the same point in the room
Start with the look-at point. It is one point in space that both eyes agree on. That makes it good for aiming a bead, steering a creature, or moving things with the viewer's glance. The per-eye readers are for drawing the eyes themselves. Put an eyeball at worldEyePosition, a pupil a few millimeters along gazeDirection, and a beam from each eye to worldLookAtPoint. Use the blink blendshapes (.eyeBlinkLeft / .eyeBlinkRight) alongside them.
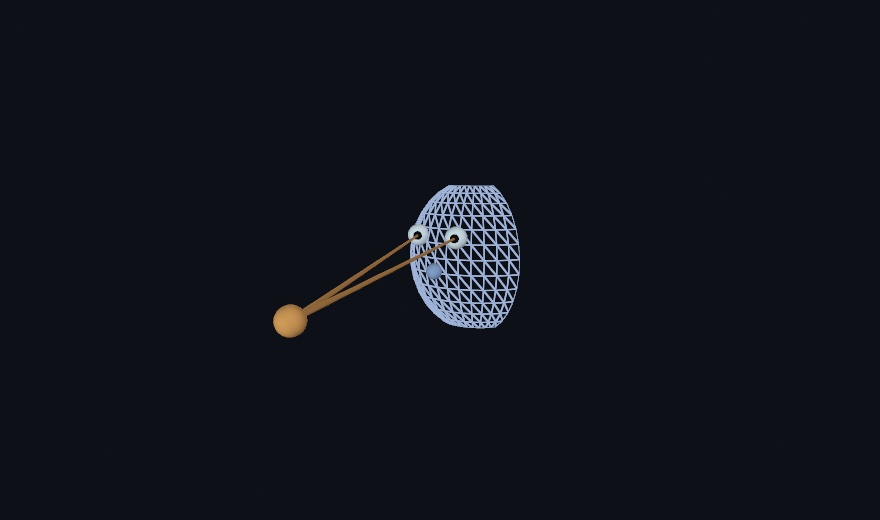
The bundled example is swift run --package-path Examples Example-3D-Phone-PhoneGaze. It draws eyeballs at the streamed eye poses, with beams converging on the look-at bead.
The hands
In Hands mode the phone finds the hands in front of the rear camera, up to 4 at once. Each hand arrives as a PhoneHand. A hand is a 21-joint skeleton: the wrist, then four joints along each finger from base to tip. The detection runs on the phone's own Neural Engine, so the Mac receives finished skeletons.
Every joint carries an upright 2D image point, already rotated for how the phone is held. On a LiDAR phone each joint also carries a metric 3D position in ARKit world space. The phone reads the joint's depth pixel, unprojects it through the camera intrinsics, and places it in the world with the camera pose. That is the same fixed, gravity-aligned world the depth sweep, the room mesh, and the body's anchor use. So a live hand can reach into a scanned scene. Without LiDAR the hands arrive in 2D only and draw as a flat overlay.
for hand in device.latestHands {     // up to 4
    hand.chirality                   // .left / .right / .unknown, as the camera sees it
    hand.confidence                  // Double 0…1, the model's overall trust
    hand.position(.indexTip)         // Vector3?, metric ARKit world space (needs LiDAR)
    hand.point(.indexTip, in: bounds) // Vector2?, the 2D point mapped into a rectangle
    hand.bones()                     // [(Vector3, Vector3)], 3D bone segments
    hand.bones(in: bounds)           // [(Vector2, Vector2)], the flat skeleton
    hand.pinchDistance               // Double?, thumb tip to index tip, meters
    hand.cloud()                     // PointCloud, the lifted hand as splats
}
device.latestHand                    // PhoneHand?, the most confident one
latestHands is the complete current set each frame, so a hand that leaves drops out and the list shrinks. A joint the model could not place is absent, and has(_:) reports that. A joint whose depth pixel was a hole keeps its 2D point but returns nil from position(_:). hasWorldPositions says whether a hand lifted at all, so a sketch can use it to choose between its 3D and 2D drawing.
pinchDistance is the basic gesture reading. It is the distance from thumb tip to index tip in meters, and it is nil unless both lifted. A value under about 2 cm reads as a closed pinch. PhoneHand.skeleton names the 20 bones, and PhoneHand.tips names the five fingertips. PhoneHand.fingerChains gives each finger's chain starting at the wrist, ready to run a tube or a ribbon along.
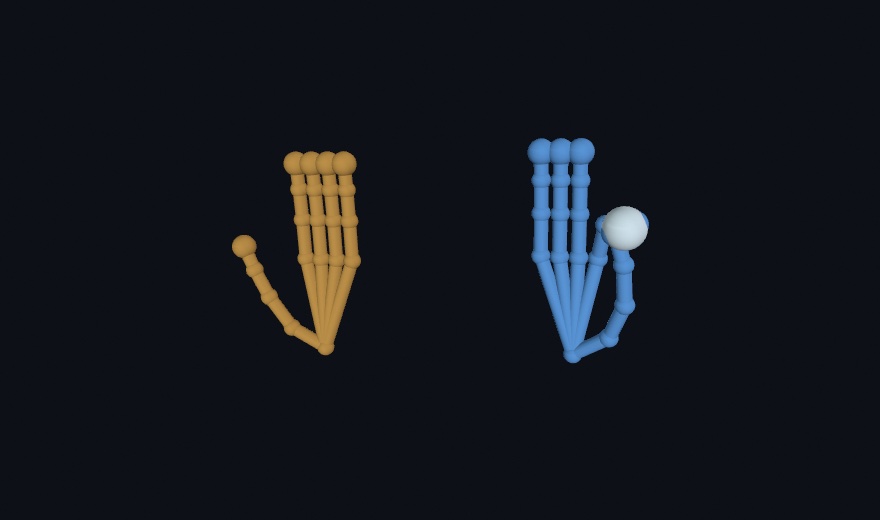
The bundled example is swift run --package-path Examples Example-3D-Phone-PhoneHands.
The text in view
In Text mode the phone reads the text in front of the rear camera. Each line arrives as a PhoneText with its string, the reader's confidence, and its position. The recognizer is Apple's on-device recognizer, the same engine behind Live Text.
The four corners of a line are upright 2D image points, already rotated for how the phone is held. On a LiDAR phone the corners also lift to metric 3D in ARKit world space. That is the same fixed world as the depth sweep and the hands. worldTransform turns the corners into one matrix for transform(_:). Its origin is the line's center. Its x axis runs along the reading direction, its y axis runs up the line, and its z axis points out of the surface. Without LiDAR the lines stay 2D and draw as a flat overlay.
for line in device.latestTexts {
    line.text                        // what the line says
    line.confidence                  // Double 0…1, the reader's trust
    line.corners(in: bounds)         // [Vector2], the quad mapped into a rectangle
    line.bounds(in: bounds)          // Rectangle, the box around it
    line.worldCorners                // [Vector3], metric ARKit world space (needs LiDAR)
    line.worldCenter                 // Vector3, the quad's center
    line.worldWidth                  // Double, meters along the reading direction
    line.worldHeight                 // Double, how tall it stands, 0 when it did not lift
    line.worldTransform              // simd_float4x4?, the line's placement matrix
}
device.latestText                    // PhoneText?, the line filling the most of the picture
latestTexts is the complete current set each frame, so a sign that leaves the view drops out. A line lifts all four corners, never three. hasWorldPlacement says whether the lift happened. The recognizer completes a few readings per second, which is below camera rate, because it runs at the .accurate recognition level. The .fast level would miss small text across a room.
The bundled example is swift run --package-path Examples Example-3D-Phone-PhoneWorldText.
The pictures and objects it knows
In Markers mode the phone looks for things you have given it. There are two ways to give it one. The sketch can say what to look for and send the file down the cable, which keeps the whole sketch in one .swift file. Or a reference can be a file in the capture app's own folder, which is the rest of this section. It can be any picture, or an .arobject that a scan produced. To add one, connect the cable, open the phone in Finder, then Files, then Ollin Capture, and drop the file in. AirDrop and the Files app work the same way. The app reads the folder when the mode starts. The Read the folder again button picks up a file dropped in later.
A picture needs its printed width in meters. No image file carries that, so the file name states it. poster@30cm.png, card-50mm.jpg, plate 12in.heic, and tile_0.4m.png all state a size. The units are centimeters, millimeters, inches, and meters. A name that states no size gets 15 cm, and the app says so on its screen. What is left after the size is the marker's name, so poster@30cm.png is the marker poster.
Each find arrives as a PhoneMarker in ARKit world space, the same fixed world as the depth sweep, the room, and the hands. placement is the frame to draw through. Its origin sits at the middle of the thing. Its x axis runs across the width, its y axis runs up the height, and its z axis points out of the face. The frame is orthonormal, so nothing drawn through it is scaled.
for marker in device.latestMarkers where marker.isTracked {
    marker.name                      // String, the reference file's own name
    marker.kind                      // .image or .object (isImage / isObject read the same)
    marker.width                     // Double, meters (what it really measures)
    marker.placement                 // simd_float4x4, ready for transform(_:)
    marker.position                  // Vector3, the middle of it
    marker.facing                    // Vector3, out of the printed face
    marker.corners                   // [Vector3], perimeter order (tl, tr, br, bl)
}
device.marker(named: "poster")       // PhoneMarker?, by name
device.latestMarker                  // PhoneMarker?, the biggest one being followed
latestMarkers is the complete current set each frame. A picture that leaves the view stays in the set with isTracked off and holds its last placement. So the sketch decides whether to keep drawing on it.
Three things decide whether this works in a room:
- A picture is found by its detail. A photograph or a dense drawing is found across a room. A flat logo or a large plain area is not. ARKit checks each reference as it loads, and the app prints what ARKit complains about. So a picture that will never be found is reported before you try it in a room.
- The printed width is what places it. A wrong width puts the picture at the wrong distance instead of losing it. ARKit also estimates the real size and reports it through
scaleFactor.widthandheightalready include that factor. - An object is found, not followed. ARKit tracks a picture while it stays in view. A scanned object gets one placement where it was found and keeps it. So an object marks a place, and a picture marks a moving thing.
The bundled example is swift run --package-path Examples Example-3D-Phone-PhoneMarkers.
Saying what to look for, from the sketch
Everything above runs one way: the phone broadcasts and the Mac reads. This is the one thing that runs the other way. The sketch tells the phone which mode to run, and gives it the pictures to look for, so the .swift file carries the whole work. A phone that has never seen your sketch knows what to find the moment the cable goes in.
override func setup() throws {
    device.use(.markers)                                    // which mode to run
    device.look(for: [                                      // and what to look for
        try .picture(resource: "poster", withExtension: "png", in: .module, printedWidth: 0.3),
    ])
    device.start()
}
Both are declarations, not commands fired once. The device remembers them and says them again every time it connects, so plugging in the cable, or launching the capture app, after the sketch is already running works exactly like doing it first.

The top half is one declaration: the mode first, then a count, then one frame per picture. The sizes are what those frames weigh on the wire. A photograph is most of the cable's work, and everything else is a handful of bytes. The bottom half is the reconnect, where the same declaration goes down again with nobody asking.
A reference is a file plus the one measurement no image file carries: how wide you printed it, in meters. Build one from a bundled resource, from a path, or from a picture the sketch already holds:
try PhoneReference.picture(resource: "poster", withExtension: "png", in: .module, printedWidth: 0.3)
try PhoneReference.picture(path: "~/Pictures/card@50mm.jpg", printedWidth: 0.05)
PhoneReference.picture(photo, printedWidth: 0.21, named: "blankets")    // an Image you loaded
try PhoneReference.object(resource: "teapot", in: .module)              // a scan; it knows its own size
The three that read a file throw a FileError when it is not there (missing) or its pixels will not read (unreadable), so the compiler makes you decide what to do about a missing picture; the one handed an Image returns nil when its pixels will not encode. Left out, named: is the file's own name with any stated size taken off, the same rule the reference folder uses: poster@30cm.png declares the marker poster either way.
What the phone says back
use(_:) and look(for:) are answered. latestState is what the phone says it is doing, and it is worth reading, because the failure here is otherwise silent: ARKit judges on the phone whether a picture has enough detail to be found at all, and a print it refuses would simply never arrive.
if let state = device.latestState {
    state.mode                       // PhoneCaptureMode, what it is running
    state.isSupported                // false when the hardware isn't there
    state.referenceCount             // how many things it is looking for
    state.isLookingForAnything       // whether that count is more than none
    state.referencesAreDeclared      // true when the sketch sent them
    state.statusMessage              // the sentence on the phone's own screen
    state.notes                      // what it could not use, in plain sentences
}
It arrives when something changes rather than every frame, so read it as standing state.
Four things are worth knowing:
- The person keeps the last word.
use(_:)moves the phone as if somebody had tapped the mode, and a tap afterwards moves it back. Nothing here forces a mode, which is what lets somebody take over a running sketch. Readstate.moderather than assuming the ask landed. - A declared library replaces the folder. While a sketch is declaring, the phone stops reading the files somebody dropped into its own folder, and its screen says so. When the sketch disconnects the folder takes over again. A sketch that declares nothing leaves the folder in charge, which is still the way to give the phone a picture without writing one into the sketch.
- A picture is fitted to the cable. ARKit wants detail, not size. A picture wider than
PhoneReference.maxPictureEdge(1024 px) is redrawn to fit and re-encoded as JPEG; one already within that, and small enough for a single frame, travels byte for byte, so a hand-made PNG arrives exactly as you shipped it. At mostPhoneWire.maxReferences(32) references travel. - Declaring nothing is not the same as declaring an empty list.
look(for: [])says "look for nothing", and the folder stays out. Never callinglook(for:)leaves the folder in charge.
The bundled example is swift run --package-path Examples Example-3D-Phone-PhoneMarkers, which sends a bundled photograph and asks for Markers mode, so the only setup is to print the picture.
The phone as a pointer
Every payload above describes the room. Wand mode describes the person holding the phone. The phone tracks its own place with plain world tracking, so it needs no LiDAR. The screen under the thumb becomes the button.
guard let wand = device.latestWand, wand.isTracked else { return }

wand.position                        // Vector3, where the phone is (meters)
wand.pointing                        // Vector3, out of the back of it, length 1
wand.ray                             // Ray3, the beam: ask it what it hits
wand.point(at: 2)                    // Vector3, two meters out in front
wand.placement                       // simd_float4x4, ready for transform(_:)
wand.up                              // Vector3, up the screen
wand.across                          // Vector3, right across the screen
wand.isPressed                       // Bool, a finger is on the pad now
wand.pressCount                      // Int, presses so far, never falls
wand.touch                           // Vector2?, -1...1 across and up, nil when free
wand.quarterTurns                    // Int, the clockwise turns that stood the hold upright (portrait is 1)
ray is what a sketch usually reads. It starts at the phone and runs in the direction the phone points, so Ray3 answers what the person is pointing at:
for (i, ball) in balls.enumerated() where wand.ray.hit(sphereAt: ball, radius: 0.13) != nil {
    aimed = i
}
Know four things before you build on it:
- The beam comes out of the back. Point the rear camera at a thing and you are pointing at it.
placementis the phone's own frame: x runs across the screen, y runs up it, and z comes out of it toward you. Sopointingis the frame's -z, the same direction a camera looks in Ollin's own 3D. - The press is carried twice, on purpose.
isPressedis the state now, which is what a drag reads.pressCountonly rises, so a tap that landed and left between twodraw()calls is still seen. Keep last frame's count and compare it. - The thumb is a rate, not a place.
touchis where the thumb sits on the pad. The pad is small and a room is not. So readtouchas a speed,distance += touch.y * speed * deltaTime, rather than as a position. - The room's origin is where the mode started. Everything is in the same ARKit world space as the depth sweep and the room. That world begins where the phone stood when Wand mode began. So lay a scene out in front of that spot, or let the person walk to it.
isTracked goes off while the phone is finding its place. The button keeps working through that, so a sketch can take presses while the pose is not usable.
The bundled example is swift run --package-path Examples Example-3D-Phone-PhonePointer.
World depth
In World mode the phone's rear LiDAR streams a world-facing RGBD frame. The frame holds a metric depth map, the matching color image, the camera intrinsics, per-pixel confidence, and the camera's 6DoF pose. PhoneDevice exposes it as the core RGBDFrame, a type that is independent of its source. So the frame unprojects into a point cloud the same way every depth source does. This mode needs a LiDAR iPhone, which means a Pro model.
if let cloud = device.pointCloud(depthRange: 0.3...5.0) {
    camera(.orbiting(target: .zero, radius: 2.5, azimuth: time * 0.3, elevation: 0.18))
    drawPointCloud(cloud)
}

device.latestFrame              // RGBDFrame?, depth + color + intrinsics
device.latestPose                    // simd_float4x4?, the camera's 6DoF pose
pointCloud(...) is a shortcut for latestFrame?.pointCloud(...) with rear-LiDAR defaults: minConfidence: .medium and an open depth range. See RGBD.md for the full unprojection parameters and the coordinate space. That space is camera-relative, with +x right, +y up, and the camera looking along -z. For finer control, such as sampling a single depth point or lifting a 2D pose to metric 3D, use latestFrame and the RGBDFrame API directly.
PhoneDevice is also a FrameSource and a VideoFeed in this mode. So a vision tracker can analyze the color feed, and drawFrame can letterbox it. The color frame is present only while World mode is streaming.
The bundled example is swift run --package-path Examples Example-3D-Phone-PhoneDepthCloud.
World fusion
A single depth frame is only the slice of the world in front of the lens. The camera's 6DoF pose, latestPose, turns the slices into a whole. ARKit's world is fixed and gravity-aligned, so transforming each frame's camera-space cloud by its pose places it where it really is in the room. Sweep the phone and the slices build up into one scene.
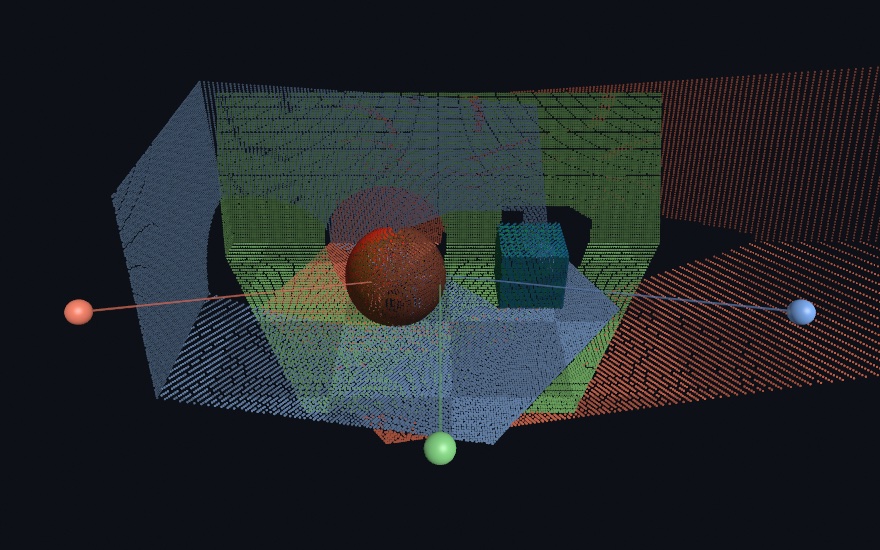
WorldCloud, in the core, does the fusing. It keeps one point per small cube of space, so seeing a wall again refreshes it in place instead of adding duplicates. Because of that, the cloud's size is bounded by the scene's surface area, not by the number of frames. So a sweep can run as long as you like:
var world = WorldCloud(voxelSize: 0.025)   // fuse at 2.5 cm

override func draw() {
    // Fuse each fresh frame once, draw() runs faster than frames stream in.
    if let id = device.latestFrameVersion, id != lastFused,
       let pose = device.latestPose,
       let cameraCloud = device.pointCloud(minConfidence: .low, depthRange: 0.3...5.0) {
        world.add(cameraCloud, correcting: pose)
        lastFused = id
    }
    camera(.orbiting(target: center, radius: r, azimuth: time * 0.2, elevation: 0.22))
    drawPointCloud(world.cloud)            // the whole accumulated room
}
add(_:transformedBy:) applies the camera-to-world pose and merges in one pass. add(_:correcting:) corrects that pose first (see below). add(_:) merges a cloud that is already in world space. latestFrameVersion changes only when a new depth frame arrives, so comparing it against the last fused id adds each frame exactly once. world.cloud is the fused PointCloud, world.count is its point total, and world.reset() starts a fresh scan. The placement primitive underneath, PointCloud.transformed(by:), is public too, so you can apply any 4×4 matrix to a cloud's positions. Vector3.transformed(by:) does the same for one point.
The bundled example is swift run --package-path Examples Example-3D-Phone-PhoneWorldScan. Sweep the phone, press C to turn the correction off, and press R to reset.
Keeping a long sweep registered
ARKit reports its pose with a small error. The error never goes away, so it accumulates. Over a minute of sweeping it grows to tens of centimeters. A wall seen at the start of the scan and again at the end then lands in two places. The fused cloud thickens into a smear. That is drift, and it is the reason a long scan looks worse than a short one.
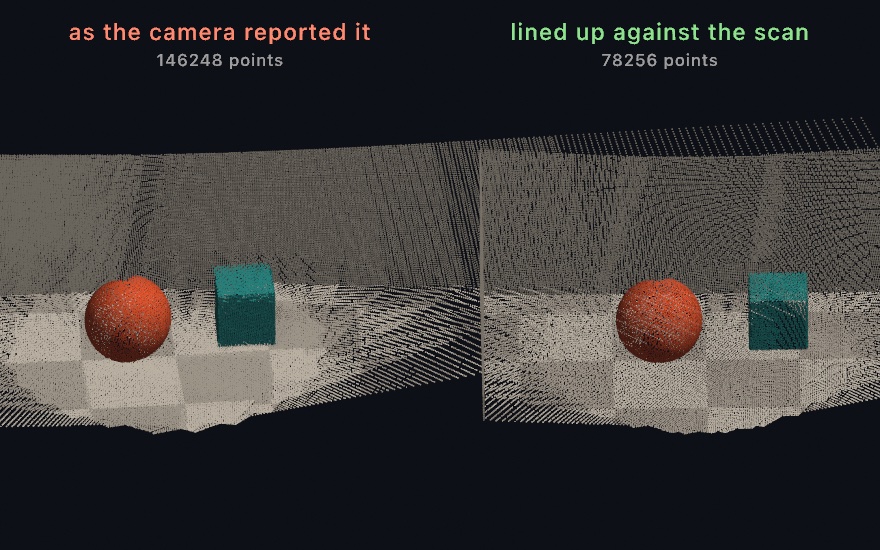
add(_:correcting:) removes the drift. Before it merges a frame, WorldCloud slides and turns that frame until it sits on the surfaces already fused. It keeps that fix and uses it as the starting guess for the next frame:
let fix = world.add(cameraCloud, correcting: pose)

fix.pose          // the pose the cloud actually went in at
fix.error         // what is left between the frame and the scan, in meters
fix.overlap       // how much of the frame found a surface to match, 0 to 1
fix.isApplied       // false when the fit was held back
world.correction  // the whole fix so far: placed = correction * reported
Two rules limit what the correction may do. First, a frame that finds too little to match, or that needs a jump rather than a nudge, is held back. The cloud still goes in, at the fix earlier frames established, and applied reads false. Second, a direction the geometry does not pin down is left alone rather than guessed. So sweeping one blank wall corrects across the wall and never slides along it.
align(_:from:settings:) runs the same fit and reports the pose without merging anything, for a sketch that wants to decide for itself whether to keep the frame.
The fit costs about half of what merging the frame costs. It stops as soon as a round stops moving the cloud, so a well-tracked frame needs only one or two rounds. CloudAlignment.Settings holds the parameters: how many points to fit through, how many rounds, how far to look, and the two guards. The defaults suit a hand-held sweep at a few centimeters per voxel.
Apply world.correction to anything else the phone reports in the same space, so that it lands where the fused cloud does:
let whereTheCameraReallyIs = Vector3.zero.transformed(by: world.correction * pose)To see the difference without a phone, run swift run --package-path Examples Example-3D-Depth-ClosedLoopScan. It sweeps a made-up room twice, side by side, and C cycles the correction.
Recognizing a place already scanned
Correcting each frame removes the newest error. It does not revise the poses behind it. Each frame agrees with the frame before it, but the chain of frames can still lean. Walk a full circle around a room, and the far wall lands well away from where it really is.
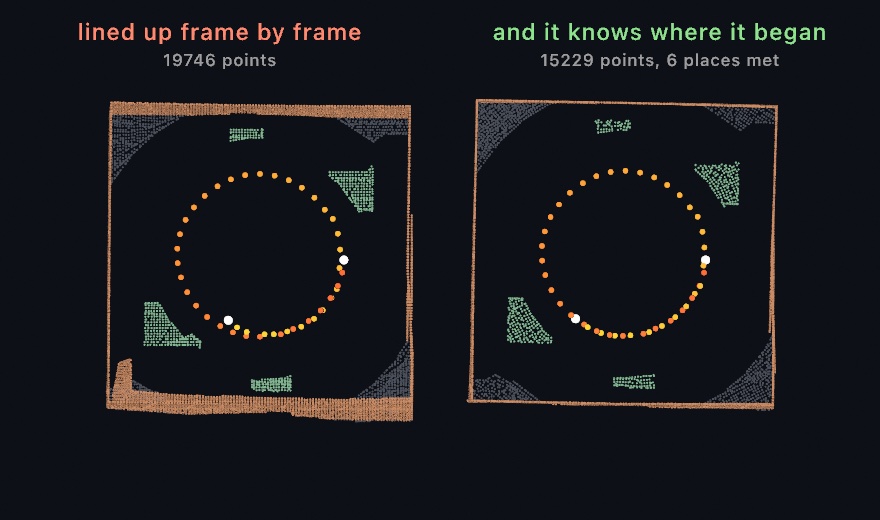
ScanGraph fixes that. It fuses and corrects exactly as WorldCloud does. It also keeps a keyframe every so often. A keyframe holds the pose the frame went in at, and a thinned copy of what that frame saw. A new keyframe that lands where an old one stood is matched against the old one directly. The match ties a late pose to an early one, so the chain becomes a loop that does not quite close. ScanGraph shares that gap out over every pose between the two, then lays the fused cloud out again from the keyframes' new poses.
var scan = ScanGraph(voxelSize: 0.025)

let update = scan.add(cameraCloud, correcting: pose)
update.alignment            // the same CloudAlignment the frame-by-frame fit reports
update.keyframe             // the keyframe this frame became, if it was worth keeping
update.loop                 // set when the scan recognized a place

scan.cloud                  // the fused points, as WorldCloud's
scan.keyframes              // every kept moment: pose, reportedPose (before correction), what it saw
scan.loops                  // every place recognized so far
scan.correction             // placed = correction * reported, straightenings included
A loop reports its match and its effect:
if let loop = update.loop {
    loop.keyframe           // the keyframe that turned out to be somewhere known
    loop.recognized         // the older keyframe it matched
    loop.overlap            // how much of the two views agreed, 0 to 1
    loop.error              // what the match left over, in meters
    loop.moved              // the biggest keyframe move the straightening made, in meters
}
A fit is bounded. CloudAlignment.Settings carries what a fit will believe: minOverlap is the least overlap to trust, maxShift the biggest move to accept in world units, and maxTurn the biggest turn in radians. A frame that asks for more than those is a mistake rather than a drift, so the fit is refused and the frame goes in where it was reported.
The search has a limit. The search compares position and viewing direction, and searchRadius, 1.5 m by default, bounds it. A scan that drifts further than that before it returns will not find the earlier keyframe. Each candidate is then fitted twice: wide, then narrow. The wide pass finds an error too big for the narrow pass to see. The narrow pass is the one that is scored, and a candidate that scores badly is refused.
A flat wall can defeat the fit. A camera facing one flat wall can slide along that wall and turn about its normal. Every such pose fits the wall equally well. Three of the six reported numbers are then unmeasured, and they record drift as though it were measured. Overlap and leftover error both look perfect. Only the fit's conditioning reveals this. It is reported as stability on CloudAlignment, and a match under matching.minStability is refused. That is why a room with objects in it is easier to scan than a bare corridor.
A straightened scan is rebuilt from the keyframes. So keyframeDetail, 4 cm by default, sets the detail the finished scan holds. It also sets the memory the keyframes cost. Use a value near the fusion voxelSize for the most detail, or several times it to stay light. Frames after the last keyframe are not kept, so they are not laid down again. The sweep replaces their detail as it continues.
The remaining parameters are on ScanGraph.Settings, read and written as scan.settings:
keyframeDistanceandkeyframeTurnare how far the camera has to move, in meters, or turn, in radians, before the sweep keeps another keyframe.separationis how many keyframes back to start looking, since the ones just behind are neighbors rather than a place returned to, andcandidatesis how many old keyframes one new one is tested against.neighborhoodfolds that many keyframes either side of a candidate in with it, so the match is made against a patch of the room rather than one narrow view.minOverlapis the least the two clouds have to agree, 0 to 1,maxErrorthe most a believed match may leave over in meters, andmaxViewAnglehow differently the camera may have been facing. Two views of one place from opposite sides share almost no surface, so a match between them is far more likely to be a mistake than a memory.minSnapis how much a match has to disagree with where things already stand before the scan is straightened. Below it the match is kept as a measurement and nothing moves.turnScaleis how far from the camera a turn is weighed when the scan is straightened, which is what makes radians and meters comparable. Leave it nil and the scan takes it from what the camera actually saw. Set it too small in a big room and the straightening trades a turn it should have fixed for a move it should not have made, so the scan comes out square but turned.reachis how much wider the first of the two matching passes looks than the second,alignmentis the fit each arriving frame gets, andmatchingthe harder fit a candidate place gets.
Without a phone, swift run --package-path Examples Example-3D-Depth-ClosedLoopScan walks a made-up room twice, side by side. The left half aligns frame by frame. The right half also closes loops. The true walls are drawn over both.
The room mesh
In Room mode the phone sends the room itself instead of raw depth. ARKit reconstructs the space around the phone as a triangle surface on the device, and it labels each triangle with what it is. What arrives on the Mac already has normals and already tells the floor from the wall. The same mode also reports the flat surfaces in that room. Both come from one session and one world origin, so the two always agree about where things are.
World fusion builds a cloud of points on the Mac. The room mesh is a solid surface built on the phone. Both come from the same LiDAR, so choose by what you want to do with the result. Points suit a cloud you scatter, deform, or reconstruct yourself. A mesh suits a surface you light, hide things behind, or bounce something off.
device.sceneMesh                     // PhoneSceneMesh, the room scanned so far
device.sceneMeshVersion              // Int?, changes when a block arrives or is retired
device.resetSceneMesh()              // forget it and collect the room again
The room arrives in blocks. ARKit divides the space into pieces, reports each piece as its own anchor, and keeps improving a piece as you look at it again. So a block arrives many times under the same identity, and the newest reading replaces the last one. Blocks arrive at up to 15 a second while you walk.
Rebuild the mesh when it changes, never once per frame. A scanned room reaches hundreds of thousands of triangles. draw() runs far faster than blocks arrive. Use sceneMeshVersion as the gate:
var room = Mesh(positions: [], indices: [])
var built: Int?

override func draw() {
    if device.sceneMeshVersion != built {
        built = device.sceneMeshVersion
        room = device.sceneMesh.mesh          // the whole room, one Mesh
    }
    drawMesh(room)
}
PhoneSceneMesh gives three forms of the same room:
let scan = device.sceneMesh
scan.mesh                            // Mesh, the whole room, world space, meters
scan.mesh(of: .floor, .table)        // Mesh, only the labels you ask for
scan.mesh { surface in ... }         // Mesh, painted a color per triangle
It also carries what you need to frame the room and report on it. Those are chunks, chunkCount, vertexCount, triangleCount, bounds, center, isEmpty, and foundSurfaces, which lists the labels the scan has actually produced. A chunk is a PhoneSceneChunk, one block of the room as ARKit maintains it, and it holds the raw arrays: positions in world meters, normals paired with them by index, indices, surfaces (what the phone thinks each triangle is, one per triangle, empty when the scan carries no classification), and its own triangleCount.
A label is a PhoneSurface: wall, floor, ceiling, table, seat, window, door, or unclassified. ARKit decides what a surface is only once it has seen enough of it, so early in a scan almost everything is unclassified. That is expected behavior, not a fault. A sketch that depends on labels should say so while the room fills in. foundSurfaces tells you which labels are available.
// A floor you could stand something on, and the rest of the room behind it.
fill(Color(white: 0.25)); drawMesh(scan.mesh)
fill(Color(hex: 0x4C9A6B)); drawMesh(scan.mesh(of: .floor))
Positions are in ARKit's fixed, gravity-aligned world space, in meters. That is the same space latestPose reports in, so a mesh block and a fused cloud from one session line up.
Starting a scan resets that world origin. An older room would then float in a space that no longer exists. So every block says which run of the scanner it came from. PhoneDevice drops the room it holds as soon as a new run begins. Leaving Room mode and coming back starts a new run.
Scene reconstruction needs a LiDAR sensor, so the surface arrives only from Pro-tier iPhones. The flat surfaces below need no LiDAR, so Room mode is worth opening on any phone. The bundled example is swift run --package-path Examples Example-3D-Phone-PhoneRoomMesh.
The flat surfaces
Room mode also reports the flat surfaces in the room. ARKit finds a floor, a wall, a table top, or a seat as a single flat patch. It grows the patch as you look around. Each patch carries a label, the same label ARKit puts on a triangle of the surface.
The mesh is the whole shape of the room, down to the clutter. The flat surfaces are the few places worth putting something on or hanging something from. They also need no LiDAR, because plane detection runs on any phone the capture app installs on.
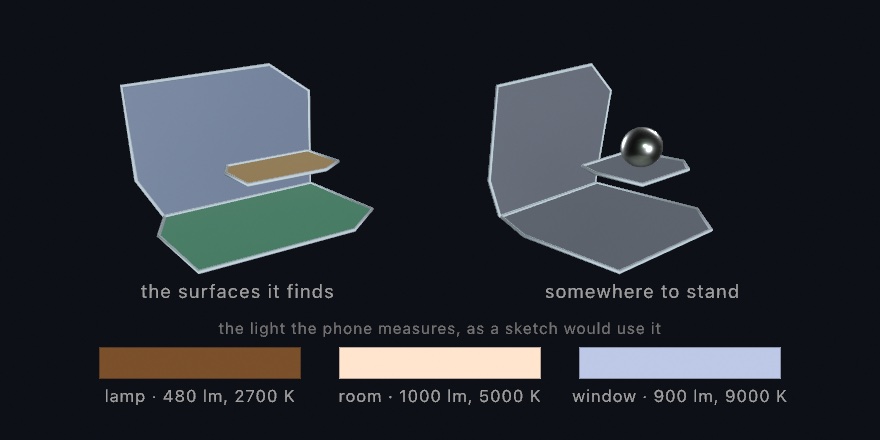
device.planes                        // PhonePlanes, every flat surface found so far
device.planesVersion                 // Int?, changes when one arrives, grows, or is retired
device.resetPlanes()                 // forget them and collect again
Each surface is a PhonePlane, already in world space:
for plane in device.planes.flat {
    plane.surface                    // PhoneSurface: floor, table, seat, wall, …
    plane.center                     // Vector3, the middle of it
    plane.normal                     // Vector3, the way it faces
    plane.area                       // Double, square meters, measured on the outline
    plane.boundary                   // [Vector3], the real outline, a convex polygon
    plane.mesh                       // Mesh, the outline filled in
    plane.outline                    // [Vector3], a closed loop, ready for drawTube
}
The whole set reads the same way:
let room = device.planes
room.flat                            // [PhonePlane], floors, tables, seats
room.upright                         // [PhonePlane], walls
room.planes(of: .table, .seat)       // [PhonePlane], only these labels
room.largest                         // PhonePlane?, the most surface, by real area
room.largest(of: .table)             // PhonePlane?, the biggest of a label
room.floor                           // PhonePlane?, the labeled floor, or the lowest flat one
room.mesh { surface in ... }         // Mesh, every surface painted by what it is
largest measures the outline, not the box around it. A long thin shelf can have a big box and very little surface. Choosing it as the ground would put your sketch on a shelf.
floor answers before ARKit has decided. ARKit's label arrives late. So floor gives you the labeled floor when there is one, and the lowest flat surface until then. A sketch can therefore stand something on the ground a second or two after the app opens.
// A ball resting on the biggest flat thing in the room.
if let ground = device.planes.largest(of: .table) ?? device.planes.floor {
    withState {
        translate(ground.center + ground.normal * 0.15)
        drawSphere(radius: 0.15)
    }
}
Surfaces share the room mesh's world space and its scan number, so a new run of the scanner clears both together. The bundled example is swift run --package-path Examples Example-3D-Phone-PhoneRoomPlanes.
The room's light
The phone measures the light around it from its own camera image. It does this a few times a second, so a sketch can match the light in the room. Every mode that runs an ARKit session reports it. Selfie, Touch, and Sketch run none, so the last reading holds there.
if let light = device.latestLight {
    light.lumens                     // Double, as measured; 1000 is an ordinary room
    light.intensity                  // Double, the same scaled so 1 is an ordinary room
    light.kelvin                     // Double, color temperature; 6500 is neutral white
    light.color                      // Color, what a white wall in this room looks like
    light.ambient                    // Color, that white turned down by how bright it is
}
ambient is the value to use first, because it carries both the brightness and the color at once:
ambientLight(device.latestLight?.ambient ?? Color(white: 0.4))The reading follows the room, so switching on a lamp warms the sketch with it.
Face mode reports more. ARKit reads the shading on a tracked face, so a front-camera session also reports where the light comes from:
light.direction                      // Vector3?, the way the strongest light travels
light.keyIntensity                   // Double?, how strong it is, on the same scale
light.sphericalHarmonics             // [Float]?, 27 coefficients, nine per channel
light.key                            // Light?, all of that, ready to add to a scene
if let key = device.latestLight?.key { light(key) }A world-facing session has no face to read, so direction and key are nil there, and only the two ambient numbers arrive. In Room mode a sketch can add its own directional light in the room's measured color:
if let measured = device.latestLight {
    ambientLight(measured.ambient)
    light(.directional(measured.color, direction: Vector3(-0.35, -1, -0.25),
                       intensity: measured.intensity))
}
PhoneLight has a public initializer, so you can develop a sketch against a stand-in reading with no phone attached. PhoneLight(lumens: 480, kelvin: 2700) is a lamp-lit room.
Segmentation
In Segment mode the phone's rear camera runs ARKit's on-device person segmentation. The Neural Engine separates the people in the scene from the background, and the phone streams the matte plus the color frame. PhoneDevice turns them into two drawable Images:
device.latestSegmentationMatte       // Image?, a tintable white-alpha silhouette
device.latestSegmentationCutout      // Image?, the person, lifted off the background
Both are nil until a Segment-mode frame arrives, and both line up with each other when drawn into the same rectangle. The matte is white with the person's alpha, so tint(_:) recolors it into a silhouette, a drop shadow, or a colored glow. The cutout keeps the camera's own pixels where the matte is on and is transparent elsewhere. That is the person, ready to composite over anything. The cutout costs a little more to build, because the color has to be masked, so it is produced only when you read it.
guard let cutout = device.latestSegmentationCutout else {
    return drawStatus(device.waitingMessage, style: .info)
}
let rect = Rectangle(fitting: Vector2(Double(cutout.width), Double(cutout.height)),
                     in: canvasRectangle)
drawImage(cutout, in: rect)           // the person over whatever you drew first
The matte and the cutout come back upright for how the phone is held, and they stay aligned with each other. The capture app sends the device orientation, and PhoneDevice rotates both images to match. Rear-camera person segmentation needs an A12 or later iPhone. The bundled example is swift run --package-path Examples Example-3D-Phone-PhoneSegmentation. It draws whichever camera is feeding it.
Selfie mode does the same job with the front camera. ARKit's person segmentation works only on the rear camera. So the app runs the front camera through a plain capture session and computes the matte with Vision instead. The same two accessors update, and a sketch does not need to know which camera fed them. The feed arrives mirrored, like the phone's own front-camera preview, because that is how a person expects to see their own picture. For the unmirrored view, flip it when drawing, with a negative x scale inside withState { }. Selfie runs no ARKit session, so latestLight pauses there and holds its last reading. Selfie also needs no particular chip. Any iPhone front camera will do.
Where the eye goes
In Attention mode the phone maps where its picture draws the eye. Vision's attention model runs on the phone's Neural Engine over the rear camera. The model is trained on human gaze and responds most to faces and contrast. Each analyzed frame streams a reading. The reading holds a coarse heat map of visual attention, the bounding regions where it peaks, and the color frame it was read from. It is the on-device counterpart of the Mac's own saliency tracking, for when the picture that matters is the one the phone is pointed at.
if let attention = device.latestSaliency {
    attention.salience(at: p, in: rect)  // Double 0…1, the pull under a canvas point
    attention.regions                    // [PhoneSalientRegion], what stands out
    attention.strongestRegion            // PhoneSalientRegion?, the model's best
    attention.heatWidth                  // Int, the heat map's own coarse pixel size
    attention.heatHeight
    for region in attention.regions {
        region.bounds(in: rect)          // Rectangle, the box mapped into the frame
        region.confidence                // Double 0…1, the model's trust
        region.worldCenter               // Vector3, ARKit world space (needs LiDAR)
    }
}
device.latestSaliencyHeatMap             // Image?, a tintable white-alpha glow
device.latestSaliencyFrame               // Image?, the camera frame it was read from
The heat map is coarse on purpose. It has the model's own resolution, a few thousand pixels. When you draw it into the frame's rectangle, it stretches into a soft spotlight. tint(_:) recolors it into a glow, a fog, or a warm haze. salience(at:in:) reads the value under any canvas point. So the same surface can serve as a density field for stippling or as an attractor for particles. Everything arrives upright for how the phone is held. Map boxes and queries through the rectangle you draw the frame into, and they line up.
On a LiDAR phone each region's center also lifts to a metric 3D position in ARKit world space, and hasWorldPlacement says whether it did. That is the same world the depth sweep, the room, and the hands stand in. So the thing being looked at keeps a place in that scene. Only the center is lifted, because a box's corners land on the background.
The model completes a few readings per second, which is below camera rate, and the last reading holds between them. The bundled example is swift run --package-path Examples Example-3D-Phone-PhoneAttention.
How the picture is moving
In Flow mode the phone measures how its picture is moving. Vision's optical flow runs on the phone between consecutive rear-camera frames. Each pair streams a reading: a dense field of motion vectors and the color frame it was measured on. It is the on-device counterpart of the Mac's own FlowTracker, for when the picture that matters is the one the phone is pointed at. It needs no LiDAR.
device.latestFlow is a PhoneFlow, and it reads the way the Mac tracker's field reads. field is the same MotionField value, so a helper written against one takes the other:
if let motion = device.latestFlow {
    motion.vector(at: p, in: rect)           // Vector2, how far the picture under p moved, in canvas points
    motion.samples(in: rect, every: 36)      // [MotionField.Sample], a grid of them to draw as arrows
    motion.averageFlow(in: rect)             // Vector2, the global drift (a pan reads as one direction)
    motion.averageFlowNormalized             // the same drift in 0…1 of the frame, y up
    motion.interval                          // Double, seconds between the two frames measured
    motion.field                             // MotionField, the Mac tracker's own value
    motion.size                              // Vector2, the map's resolution
    motion.confidence                        // Double 0…1, the model's trust in the field
}
device.latestFlowFrame                       // Image?, the camera frame it was measured on
Map queries through the rectangle you draw the frame into and the vectors land on what moved. A vector is a displacement between the two frames. The phone measured both, so interval says how far apart they were, and a vector over it is a speed in canvas points per second. The Mac's tracker cannot say that, because its analysis interval breathes with load.
if let motion = device.latestFlow {
    for s in motion.samples(in: rect, every: 36) {
        drawLine(s.position, s.position + s.flow * 3)
    }
    for i in dust.indices {
        dust[i] += motion.vector(at: dust[i], in: rect) * 0.5
    }
}
The map is coarse on purpose, a hundred-odd cells across, because the wire's cost is the grid's size and a sketch samples it every few canvas points anyway. A query reads between the four nearest cells, so a particle drifting across a cell edge never snaps. The phone measures camera-native and the Mac stands the map upright for how the phone was held, turning the grid and every vector in it by the same quarter turns, so the field and latestFlowFrame line up in one rectangle.
Motion is only measurable where the picture has texture, the same caveat the Mac's field carries. A blank wall does not read as zero motion. It reads as noise, because there is nothing to match from frame to frame. The phone completes a few readings a second, and the last one holds between them. The bundled example is swift run --package-path Examples Example-3D-Phone-PhoneFlow: the field as streaks colored by speed over the live frame, and dust that it carries.
What the phone hears
Switch Hear on, under the modes, and the phone names the sounds around it. Apple's built-in sound classifier runs on the phone's Neural Engine over its own microphone, and the phone asks for the microphone once. It needs no camera, so it runs beside whichever mode is on. The audio never leaves the phone; only the labels and the confidences do. Every judged window, about twice a second, the phone sends every label it knows with how sure it is of each.
device.sounds is the Mac's end. It gives the same two reads the Mac's own SoundClassifier gives, over the same SoundClassification and SoundEvent values, so a sketch written against one reads the other unchanged.
Is this music? is a level that rises and falls:
let musical = device.sounds.confidence(of: "music")     // Double 0…1
let now = device.sounds.topClassification               // SoundClassification?, the strongest label
let all = device.sounds.classifications                 // everything over `threshold`, strongest first
Did somebody just clap? is an event that happens once:
for event in device.sounds.events() { print(event.label, event.confidence, event.time) }
let flash = max(0, 1 - device.sounds.timeSinceHearing("clapping") / 0.3)
An event fires when a label crosses threshold (0.6 by default) from below. A sound that keeps going is one event, not one per window, and a sound that stops and returns is two. events() drains what it returns, so read it in one place per frame. timeSinceHearing(_:) does not drain, which makes it the right read for a mark that fades.
The threshold lives on the Mac, and you can set it while the phone listens:
device.sounds.threshold = 0.4The phone sends its whole judgment and the Mac decides what counts as a sound starting. The readings run one way, and the sketch is where a threshold belongs, so two sketches can read the same phone with different ideas of what is loud enough.
Times run on the phone's audio clock, in seconds since it began listening. An event's time is the end of the window it crossed in. Between readings the Mac carries that clock forward with its own, so a fade runs smoothly rather than stepping once a window.
The vocabulary is the same three hundred-odd everyday sounds the Mac's classifier knows, spelled the same way: speech, music, clapping, dog_bark, knock, laughter. The Mac's SoundClassifier.labels lists all of them. The classifier is happy to guess, and "music" turns up faintly under almost anything, so read topClassification and the threshold rather than believing every small number. It judges a second and a half of audio at a time, so a short sound is named a moment after it happens.
device.sounds.isListening                // Bool, readings are arriving (Hear is on, the cable is in)
device.sounds.readingCount               // Int, judged windows since the device started
device.sounds.reset()                    // forget what was heard; the threshold stays
PhoneSounds can be made on its own and fed by hand, so a sketch can be developed with no phone attached, and a test can say exactly what was heard:
let ears = PhoneSounds()
ears.hear([SoundClassification(label: "dog_bark", confidence: 0.9)], at: 2, duration: 1.5)
ears.events().first?.label      // "dog_bark"
The bundled example is swift run --package-path Examples Example-3D-Phone-PhoneSounds: every sound that starts rings out in its own place on the canvas, and the levels of a few familiar ones run along the bottom.
The screen as a control surface
Tap Touch and the phone stops watching. The screen under the modes becomes the surface, and no camera session runs at all. The phone reports every finger on the glass: where each one sits, how wide the contact is, how hard it presses where the glass can tell, and how long it has been down. Nothing to charge back up after a set.
device.touches is the Mac's end, and it gives the two reads every input in Ollin gives. Where are the fingers now? is a state that comes and goes:
for touch in device.touches.down {
    touch.id                          // Int, this finger's own number
    touch.position                    // Vector2, -1…1 across and up, the middle at zero
    touch.point(in: bounds)           // Vector2, the same place inside a rectangle on the canvas
    touch.radius                      // Double, how wide the contact is, as a fraction of the screen's width
    touch.force                       // Double?, 0…1, or nil on a screen that cannot tell
    touch.age                         // Double, seconds this finger has been down
}
device.touches.isTouching             // Bool, anything on the glass
device.touches.touch(id: held)        // PhoneTouch?, one finger you are following
Did somebody just tap? is an event that happens once:
for tap in device.touches.taps() {
    ripples.append(Ripple(at: tap.point(in: bounds), born: time))
}
A finger keeps one id from landing to leaving, and the phone never hands that number to another finger. That is the whole of how a tap is found: a number the Mac has not seen is a landing. It is also why a drag fires once rather than once a frame. And it is how a tap is followed into the drag it becomes: keep the id the tap gave you, and ask touch(id:) for it each frame.
Nothing is missed. The phone sends a message every time the set of fingers changes, and PhoneTouches reads every one of them, while draw() sees only whatever is there when it looks. So a finger that lands and leaves between two frames is gone from down by the time you look, and its tap is still in taps(). taps() drains what it returns, so read it in one place per frame.
If the cable comes out while a finger is down, that finger is let go rather than left on the glass. The phone sends only on a change, so without that a pulled cable would be a note that never ends.
device.touches.tapCount               // Int, landings since the device started; only ever rises
device.touches.timeSinceTap           // Double, seconds since the last landing, for a mark that fades
device.touches.isReporting            // Bool, readings have arrived
device.touches.readingCount           // Int, readings since the device started
device.touches.reset()                // forget the fingers, the pending taps, and the count
tapCount is the non-draining read of the same thing: keep last frame's number, compare, and you see a tap you were not watching for without taking it out of anybody else's hands.
Force is nil on most iPhones, which dropped the pressure-sensing screen after the 3D Touch years. Read it as nothing reported rather than as no pressure, and reach for radius when you want an expressive axis. Every iPhone reports how wide the contact is, and a fingertip and a flat finger are far apart.
PhoneTouches can be made on its own and fed by hand, so a sketch can be developed with no phone attached, and a test can say exactly which fingers were where:
let surface = PhoneTouches()
surface.feel([PhoneTouch(id: 1, position: Vector2(-0.5, 0.25), radius: 0.06)], at: 2)
surface.taps().first?.id       // 1
The bundled example is swift run --package-path Examples Example-3D-Phone-PhoneTouches: every finger lands on the canvas as a disc sized by its width, each tap rings out where it fell, and lifting the phone warms the color.
The sketch on the phone's screen
The Mac can also run a sketch for the phone. show(_:) sends every frame down the cable as video, and the capture app shows it full screen. The fingers on the picture come back as the sketch's pointer. Nothing is built for the phone or installed on it.
import Ollin
import OllinPhone

final class Pour: Sketch {
    let device = PhoneDevice()

    override var canvasSize: CanvasSize { .size(1080, 2340) }

    override func setup() {
        device.show(self)
    }

    override func draw() {
        background(Color(white: 0.05))
        if mouseIsPressed {
            drawCircle(mouseX, mouseY, 20 + pressure * 40)
        }
    }
}
show(_:) is the whole setup. It asks the phone for Sketch mode, starts the device, and adds a PhoneScreen to the sketch. Once the cable is in and the app is open, the phone's screen turns into the canvas.
This answers a different question from installing the sketch. The picture is the Mac's, so you see how the sketch looks and plays in the hand. You do not see whether the phone's own GPU keeps up with it, which the installed app answers. In return, the loop is the Mac's. Save under the live window, and the phone shows the edit as soon as the Mac has compiled it. The inspector, the console, and the timeline stay on the Mac too.
The first finger is the pointer. mouseX, mouseY, mouseIsPressed, mousePressed(), and mouseReleased() follow it the way they follow a finger when the sketch is installed on the phone. pressure reads the press where the glass measures force, and reads a plain full press where it cannot. A second finger never moves the pointer. Neither does a finger that is still resting when the first one lifts, so lifting one hand does not throw the pointer across the canvas. The first two fingers are also a pinch and a turn. Spreading them reads on pinchScale and turning them on turnAngle, measured on the canvas, as two fingers on the Mac's trackpad read. The fingers press only while the phone is in Sketch mode, since on any other screen the glass is not the canvas. Every finger still arrives on device.touches, and the tilt on device.latestMotion, as in any mode.
let screen = device.show(self)
screen.isShowing                      // Bool, the phone is in Sketch mode and a picture has reached it
screen.drivesPointer = false          // leave the Mac's mouse alone and read device.touches yourself
screen.frameRate                      // FrameRate, the most pictures a second it sends, 60 by default
screen.device                         // PhoneDevice, the phone it belongs to
screen.stop()                         // stop sending; tap another mode on the phone to leave
How the pictures travel. Each frame is compressed as HEVC on the Mac's media engine, straight from the rendered texture. It goes out on a connection of its own, port 1339, beside the sensor stream on 1338. The phone decodes it on its own media engine. A picture is the canvas size, fitted under 1920 pixels on its long side. Most pictures carry only what changed since the one before, so a picture already made is never dropped: that would spoil every picture after it. When the cable cannot take the next picture yet, the frame is skipped before it is compressed. A picture that stands alone goes out every second, and whenever the phone connects or comes back to Sketch mode.
A reload hands the phone over. PhoneScreen belongs to the sketch it shows, so a reloaded sketch makes its own in setup(). The phone keeps only the newest picture connection, and the old sketch lets go of its own once it stops drawing.
To leave the full screen, tap the arrow in the phone's top corner. The phone goes back to the mode it was in before. As with any mode, a tap on the phone is the last word, and the sketch does not switch it back.
The bundled example is swift run --package-path Examples Example-3D-Phone-PhoneCanvas. A finger paints, the paint falls the way the phone is tilted, and every finger on the glass shows as a ring.
The air around it
Every iPhone since the 6 has a barometer, and it is the one sensor here that reads the room without looking at it. Switch Air on, under the modes, and it arrives beside whichever mode is running, about once a second. The altimeter asks for motion once.
if let air = device.latestAir {
    air.pressure                  // Double, kilopascals; about 101.3 at sea level
    air.hectopascals              // Double, the same in a weather report's unit; about 1013
    air.altitude                  // Double, meters above where the phone started measuring
    air.timestamp                 // Double, seconds on the phone's clock
}
altitude is relative, and that is the useful part. A barometer knows how the pressure has changed far better than it knows how high it is. So the number starts at zero where the phone was switched on, and answers "how much higher than that" to about a tenth of a meter. It goes below zero going down. Lift the phone off a table and it moves, which makes it a continuous control that costs no camera: a fader you play by standing up.
The pressure itself is the weather's own number. A door opening in a sealed room moves it, and a storm arriving moves it over a day.
PhoneAir can be made on its own, so a sketch can be developed with no phone attached:
let air = PhoneAir(timestamp: 0, pressure: 101.3, altitude: 0.42)Device motion
PhoneMotion is the CoreMotion sample: attitude as a quaternion, gravity, rotation rate, and user acceleration. It is the cheap payload that proves the USB transport works before any model runs:
if let m = device.latestMotion {
    m.gravity                        // Vector3, gravity direction, in g
    m.attitude                       // SIMD4<Float>, orientation quaternion (x,y,z,w)
    m.rotationRate                   // Vector3, rad/s
    m.userAcceleration               // Vector3 in g, gravity removed
}
Tilt the phone and gravity swings. That is a one-line check that the connection is working.
Notes
- The wire runs both ways, in two tag spaces. Sensor frames go up; requests (a mode, a library of references, the pictures of a sketch) come back down. Both use the same 12-byte framing, and both number their kinds from 1, because a frame's direction is decided by which end reads it rather than by its bytes. The one place the two framings part is the magic word, so a frame written the wrong way down the cable fails at its header instead of decoding as whatever happens to share its number.
- The wire is Ollin's own, shared verbatim. Both ends are Swift, so the protocol skips the packed-image trick that cross-language tools use. It is a length-prefixed stream of tagged binary messages,
PhoneWire. That one source file is compiled into both the Mac satellite and the iOS app, so the framing cannot drift between them. - USB only. The transport is the
usbmuxdtunnel over the cable, on port 1338, whichPhoneDevice.streamPortspells. A sketch's pictures take port 1339 (PhoneWire.picturePort), so a picture never waits behind a sensor reading. Record3D uses port 1337, asRecord3DDevice.streamPort. Wi-Fi is deliberately left out. - Per-frame clouds are camera-relative, and fusion is world-space. A single
pointCloud(...)is in the camera's own frame, with its root at the lens. The skeleton is in model space, with its root at the origin. The world fusion step lifts a sweep into one fixed world cloud by applying each frame'slatestPose. It fuses the clouds from several poses into a single registered scene. Keeping a long sweep registered and recognizing a place already scanned then correct ARKit's own drift on top of that. The body's anchor lives in the same world, so a skeleton and a swept room combine directly. - Depth is raw over the wire. The LiDAR depth map ships uncompressed. A 256×192 frame is ~196 KB, which is comfortable over USB. LZFSE compression is a later optimization. The color image is sent as a downscaled JPEG.
- The catalog is still growing. Today's payloads are body pose, face, hands, the text in view, the pictures and objects it knows, where the eye goes, how the picture is moving, world depth, the room mesh, the flat surfaces, the room's light, person segmentation, motion, the phone held as a pointer, what the phone hears, every finger on its screen, and the air around it. Adding a richer sensor means the same app sends a new tagged payload, with no new pipeline.
- A mesh block is carried raw. Sending is what is throttled. The phone reads a block's geometry the moment ARKit hands it over, because those buffers belong to the session. Then it queues the block and sends a few blocks at a time. A block too big for one payload is skipped, and the app counts it on its own screen.