Vision
Vision lets a sketch see with the Mac's camera. It lives in a separate library, so the drawing core stays free of AVFoundation and Apple's Vision framework. Add import OllinVision beside import Ollin to reach it.
There are two pieces. The first is a Camera. It captures frames and hands them over as drawable Images. The frames come from the built-in camera, a Continuity Camera iPhone, or an external webcam.
The second piece is a tracker. It attaches to a frame source, which is that camera or a playing VideoPlayer. It runs Apple's on-device perception on each frame and publishes typed results, which you read in draw(). Every tracker follows the same shape, from FaceTracker for faces through hands, bodies, segmentation, contours, and text. At the end of the catalog is ModelTracker, which runs your own Core ML model the same way.

The usual flow starts in setup(). Make a camera, call start() on it, and attach the trackers you want. Then, in draw(), draw the feed with drawFrame(camera) and read each tracker's results. drawFrame letterboxes the latest frame, shows a standard waiting notice until the first frame arrives, and returns the rectangle you map results into.
import Ollin
import OllinVision

final class Faces: Sketch {
    let camera = Camera()
    lazy var faces = FaceTracker(camera)

    override func setup() { try? camera.start() }

    override func draw() {
        background(.black)
        guard let rect = drawFrame(camera) else { return }

        noFill(); stroke(.green); strokeWeight(2)
        for face in faces.faces {
            drawRect(face.bounds(in: rect))
        }
    }
}
Contents
- Camera - capture the webcam (built-in, Continuity, or external)
- Frame sources - trackers over any source of frames (a video, your own)
- When there is no camera -
Camera.orStillandStillFrames, so a sketch still has something to read - FaceTracker - find faces, landmarks, and head pose
- Face - one detected face, and reading its parts
- ContourDetector - trace edges into vector contours, read as
contourTree - DetectedContours - contours as
Contours andShapes - HandTracker - find hands and their 21-joint skeletons
- Hand - one detected hand, its joints and fingers
- BodyTracker - find people and their pose skeletons
- BodyTracker3D - one person's pose in space, in meters
- Body3D - the 3D skeleton in canvas, model, and camera space
- PersonSegmenter - lift the people out of the frame
- SubjectSegmenter - lift whatever stands out as foreground
- PointSegmenter - lift whatever you point at
- Segmentation - a soft matte and the cutout it makes
- RectangleDetector - find rectangular shapes and their corners
- BarcodeScanner - read barcodes and QR codes
- TextRecognizer - read text (OCR) from the feed
- ObjectTracker - follow a patch you point at across frames
- TrackedObject - the tracked box and its confidence
- TrajectoryTracker - find things flying along parabolic arcs
- DetectedTrajectory - one arc: its points, fit, and identity
- FlowTracker - measure optical flow, the whole picture's motion
- MotionField - the motion field, sampled anywhere on the canvas
- ImageClassifier - name what's in the picture
- Classification - one label and how strongly it applies
- SaliencyTracker - map what draws the eye
- Saliency - the heat map, regions, and point query
- ConceptTracker - score any phrases you type against the picture
- ModelTracker - run your own Core ML model over the frames
- ModelOutput - its decoded surfaces: classifications, objects, map
- ClassMask - a semantic segmenter's output: every pixel named
- DepthTracker - depth that holds still, from a video depth model
- DepthClip - the whole clip's depth, read ahead of time and answered by clip time
- Coordinate mapping - placing normalized results on the canvas
- Still images - running a tracker on a loaded image
- Availability - when a model can't run on a Mac
- Permission - the camera prompt
Camera
Camera(_ device: Camera.Device = .default)
func start() throws                          // CameraError: .noDevice, .cannotAddInput, .cannotAddOutput
func stop()
var frame: Image? { get }
var frameSize: Vector2? { get }
func fittedRectangle(in container: Rectangle) -> Rectangle?

// on Sketch, for any VideoFeed (a Camera, a VideoPlayer, your own):
@discardableResult
func drawFrame(_ feed: some VideoFeed, in container: Rectangle? = nil,
               waiting: String? = nil) -> Rectangle?
Camera is a frame source. Create it in setup(), call start() on it, and draw it with drawFrame(camera) in draw(). drawFrame draws the latest frame letterboxed into the canvas (or into container) and returns the rectangle it landed in. Map every tracker result into that same rectangle, and the overlays line up with the picture. Before the first frame arrives, drawFrame draws a standard waiting notice instead and returns nil. The notice reads "Waiting for camera…", and waiting: replaces that text. A camera sketch therefore opens with one line:
guard let rect = drawFrame(camera) else { return }drawFrame accepts any VideoFeed. VideoFeed is the core protocol that Camera and VideoPlayer conform to, and it supplies frame, frameSize, and the letterboxing fittedRectangle(in:). If you want the typed pieces, frame is the latest captured frame, or nil before the first one. fittedRectangle(in:) returns the letterboxed rectangle alone. A sketch uses it when it draws something derived from a frame, like a segmentation matte or a cutout, rather than the frame itself.
Camera.Device picks which camera. The choices are .default, .builtIn, .continuity, .external, and .deskView. .default is the system default, .continuity is a nearby iPhone, and .external is a USB or Thunderbolt webcam.
let camera = Camera(.continuity) // use a Continuity Camera iPhoneEach new frame produces a fresh Image, so draw camera.frame directly in draw() rather than holding onto it across frames.
A frame is an Image, so it can go wherever an image goes, not only onto the canvas. A mesh can use it as a texture through textured(_:). The scene can also be lit by it through environment(.feed(camera)). So the camera works as a surface and as a light, as well as a picture:
environment(.feed(camera))                  // the room as the light
if let frame = camera.frame {
    drawMesh(globe.textured(frame))         // the room as the surface
}
Set the material every frame, because each capture is a fresh Image. A fresh Image builds its texture the first time it is drawn. So a feed on a surface costs one upload per new frame and nothing while the frame holds. That is cheap for one surface, and it adds up across many. See Examples/3D/Materials/LiveSurface.
Frame sources
protocol FrameSource: AnyObject {       // lives in the Ollin core
    var frameTap: FrameTap? { get set }
}
typealias FrameTap = @Sendable (CGImage) -> Void
Every tracker takes any FrameSource, not only a camera. That protocol is what lets the same analysis run over any source of moving pictures. Camera conforms, and so does VideoPlayer. So a tracker runs over recorded footage exactly the way it runs over the live feed:
import Ollin
import OllinVideo
import OllinVision

final class Traced: Sketch {
    let player = try! VideoPlayer(path: "/path/to/clip.mp4")
    lazy var contours = ContourDetector(player)   // analyzed as it plays

    override func setup() {
        player.loops = true
        player.play()
    }
}
Trackers attached to the same source share one analysis engine, so the source is tapped once and its frames fan out to every tracker. Analysis is throttled to what the machine keeps up with, and frames are skipped rather than queued. A paused video stops producing frames, so its trackers hold their last results.
A type of your own can be a frame source too. Conform to FrameSource: hold the closure, and call it with each new CGImage from whatever thread produces them. Every tracker then accepts it. Examples/Vision/TrajectoryTracking does exactly that, because its "camera" is a small ball-launching simulation that the example renders itself.
In an export, the trackers read on the export's clock. A window analyzes whatever frame is newest when the last analysis ends. So its readings land when the machine gets to them. An export draws its frames on a clock of its own. A reading that landed by wall-clock time would land on a different frame in every run. So during an export, every frame a source offers is analyzed before the frame that offered it is drawn. A tracker's model is loaded before its first frame, rather than letting frames pass while it loads. A tracker made during the export, a lazy one included, reads the source's newest frame before its first use returns. The sources follow that clock themselves. A still feed publishes four times a second of the sketch's time, whether it is Camera.orStill under --photo or a StillFrames. A VideoPlayer hands its tap each new frame under the playhead. Both need to be stored on the sketch, which is where drawFrame reads them from anyway. The same seed then draws the same picture at any frame, with no --settle to wait out a model. The wait moves to the export instead. A model the system prepares on first use, like the one text recognition runs on the Neural Engine, can hold the first export in a new program for about a minute. A frame source of your own runs on the wall clock unless the sketch steps it. Start its thread only when isExporting is false. When it is true, advance the source to time at the top of draw(), as TrajectoryTracking does.
When there is no camera
A sketch that reads the world has nothing to show on a machine with no camera attached, or one where permission was refused. Camera.orStill(_:) picks: a running camera when there is one, and a still picture when there is not.
import OllinSamplePhotos

final class Poses: Sketch {
    var feed: (any FrameSource & VideoFeed)?
    var bodies: BodyTracker?

    override func setup() {
        let feed = Camera.orStill(SamplePhoto.reaching.load())
        self.feed = feed
        bodies = BodyTracker(feed)
    }

    override func draw() {
        background(.black)
        guard let feed, let bodies, let rect = drawFrame(feed) else { return }
        for body in bodies.bodies {
            for (a, b) in body.bones(in: rect) { drawLine(a, b) }
        }
    }
}
Everything downstream takes either one, because both are a FrameSource and a VideoFeed, so nothing but that one line knows which it got. The picture is only built when it is needed, so a machine with a camera never decodes it. The sample photographs are what the examples fall back to, but any Image works.
--photo on launch takes the picture even where a camera would have worked. That is how a still is made of a sketch that is normally live: a screenshot, a gallery thumbnail, a figure. It also keeps every camera closed. A Camera the sketch starts itself throws from start() under the flag and never touches the device. So a run with --photo never films whoever is at the machine.
StillFrames is the feed underneath, and it is public, for the case where the choice is not the camera's to make:
StillFrames(_ picture: Image, rate: Double = 4)
    var picture: Image
    var frame: Image?           // the picture, so drawFrame never waits
    var frameSize: Vector2?
    func start()
It publishes the picture over and over rather than once, four times a second by default. That is because an analyzer drops frames it cannot keep up with, as every tracker does, so a source that published a single frame could have that one frame dropped and never be read at all. Four times a second is far below what a camera asks of the same analyzer. During an export it publishes at rate times a second of the sketch's clock instead, starting on the first frame. A held clock, like a --settle draw, publishes nothing.
FaceTracker

FaceTracker(_ source: any FrameSource)
var faces: [Face] { get }
var count: Int { get }
static func detect(in image: Image) async throws -> [Face]
FaceTracker finds faces in a camera's frames. Each face comes back with a bounding box, a head pose (roll/yaw/pitch), and a capture-quality score. There are also 76-point landmarks, which cover the jaw, brows, eyes, nose, lips, and pupils. Attach the tracker to a camera, then read faces in draw().
let camera = Camera()
lazy var faces = FaceTracker(camera)
Analysis runs on a background thread. If recognition is slower than the camera's frame rate, frames are dropped so the sketch stays responsive. Only the analysis is throttled, so the displayed frame is never dropped. faces always holds the most recent result.
Face
struct Face {
    var confidence: Double
    var roll, yaw, pitch: Double          // radians
    var quality: Double?                  // 0…1 capture quality, if scored
    var hasLandmarks: Bool

    func bounds(in: Rectangle, mirrored: Bool = false) -> Rectangle
    func center(in: Rectangle, mirrored: Bool = false) -> Vector2
    func landmarks(_: FaceLandmark, in: Rectangle, mirrored: Bool = false) -> [Vector2]
}
Face is one detected face. The in: helpers map it onto the canvas, so pass the same rectangle you drew the frame into. landmarks(_:in:) returns the points of one region, ready to drawPolyline. The regions are .faceContour, .leftEye, .rightEye, .leftEyebrow, .rightEyebrow, .nose, .noseCrest, .medianLine, .outerLips, .innerLips, .leftPupil, .rightPupil, and .allPoints. Regions like the eyes and lips are closed loops, so append the first point to close the polyline.
for face in faces.faces {
    drawRect(face.bounds(in: rect))
    drawPolyline(face.landmarks(.faceContour, in: rect))
    for p in face.landmarks(.leftPupil, in: rect) { drawCircle(p.x, p.y, 3) }
}
ContourDetector

ContourDetector(_ source: any FrameSource, detectsDarkOnLight: Bool = true, contrastFactor: Float = 1)
var latest: DetectedContours { get }
var count: Int { get }
func contours(in: Rectangle, mirrored: Bool = false) -> [Contour]
func shapes(in: Rectangle, mirrored: Bool = false) -> [Shape]
static func detect(in: Image, …) async throws -> DetectedContours
The other trackers find things. This one finds edges, the boundaries between light and dark, and returns them as Ollin geometry. That turns a live camera frame into vector shapes. The traced Shapes go through the same path as any other geometry, so drawShape, SVG export, and the hatching transform all work on them. That is the output a pen plotter needs.
let camera = Camera()
lazy var contours = ContourDetector(camera)
override func draw() {
    background(.white)
    noFill(); stroke(.black)
    for shape in contours.shapes(in: bounds) { drawShape(shape) }
}
detectsDarkOnLight (the default) traces dark shapes on a light background, which suits line art and documents. contrastFactor (0…3) boosts faint edges at the cost of more noise. Point the camera at high-contrast subjects for the cleanest result. Like every tracker, it also runs once on a still image (ContourDetector.detect(in:)).
DetectedContours
struct DetectedContours {
    var topLevel: [Node]      // each Node has points + nested children
    var count: Int
    func contours(in: Rectangle, mirrored: Bool = false) -> [Contour]
    func shapes(in: Rectangle, mirrored: Bool = false) -> [Shape]
}
DetectedContours is the result of a contour trace: a tree of closed outlines. A contour can contain nested contours, like a shape with a hole or a ring inside a disk. contours(in:) flattens the tree to closed Contours mapped onto the canvas, which suits line work. shapes(in:) collects each top-level contour and its descendants into one even-odd Shape, so the nesting reads correctly when the shape is filled, hatched, or exported.
HandTracker
HandTracker(_ source: any FrameSource, maxHandCount: Int = 2)
var hands: [Hand] { get }
var count: Int { get }
static func detect(in: Image, maxHandCount: Int = 2) async throws -> [Hand]
HandTracker finds hands and their 21-joint skeletons. It is the tracker to use for gesture work. Read hands in draw(). Joints that Vision is not confident about (occluded, or off-frame) are dropped, so what you get back is what it actually saw.
let camera = Camera()
lazy var hands = HandTracker(camera)
override func draw() {
    if let frame = camera.frame { drawImage(frame, in: bounds) }
    for hand in hands.hands {
        for (a, b) in hand.bones(in: bounds) { drawLine(a, b) }
    }
}
A gesture comes from a few joints. For example, the distance between .thumbTip and .indexTip is a pinch, and .indexTip alone is a cursor. The spread of the fingertips tells an open hand from a closed one.
Hand
struct Hand {
    var chirality: Chirality        // .left, .right, or .unknown
    var confidence: Double
    func has(_: HandJoint) -> Bool
    func point(_: HandJoint, in: Rectangle, mirrored: Bool = false) -> Vector2?
    func points(in: Rectangle, mirrored: Bool = false) -> [HandJoint: Vector2]
    func finger(_: Finger, in: Rectangle, mirrored: Bool = false) -> [Vector2]
    func bones(in: Rectangle, mirrored: Bool = false) -> [(Vector2, Vector2)]
}
Hand is one detected hand. point(_:in:) maps a single joint, or returns nil if the joint was not seen, and points(in:) maps them all. finger(_:in:) returns one finger's chain as a polyline from wrist to tip. bones(in:) returns the whole skeleton as line segments. It breaks a chain at any missing joint rather than drawing across the gap.
The joints are HandJoint values: .wrist plus four per finger (.indexMCP, .indexPIP, .indexDIP, .indexTip, and so on), with HandJoint.tips for the five fingertips. A Finger (.thumb, .index, .middle, .ring, .little) has a .chain of its joints.
BodyTracker
BodyTracker(_ source: any FrameSource)
var bodies: [Body] { get }
var count: Int { get }
static func detect(in: Image) async throws -> [Body]
BodyTracker finds people and their 2D pose skeletons of 19 joints, from head to ankles. HandTracker is the close-up tool, and this is the whole-body one. Reach, lean, jump, and silhouette all come from the joints. Joints out of view (often the legs at a desk) are dropped, so the figure is whatever Vision can see.
let camera = Camera()
lazy var bodies = BodyTracker(camera)
override func draw() {
    if let frame = camera.frame { drawImage(frame, in: bounds) }
    for body in bodies.bodies {
        for (a, b) in body.bones(in: bounds) { drawLine(a, b) }
    }
}
Body mirrors Hand. point(_:in:) maps a single BodyJoint, or returns nil, and points(in:) maps them all. bones(in:) returns the skeleton as line segments, and Body.skeleton is the list of joint pairs that covers the head, spine, arms, and legs. Body pose is a heavier model, so see Availability.
BodyTracker3D
BodyTracker3D(_ source: any FrameSource)
var body: Body3D? { get }
static func detect(in: Image) async throws -> Body3D?
BodyTracker3D finds one person's pose in space from an ordinary 2D camera. BodyTracker gives flat picture coordinates, but here every joint gets a 3D position in meters. The camera is still the same single webcam. Even so, the sketch knows how far away the person is, how tall they are, and what their figure looks like from the side.
It differs from the 2D tracker in two ways, and both matter before you choose it:
- One person. The model follows the most prominent person, so you read a single
body, not a list. It isnilwhile no one is in view. To count people, or for a scene with several people, useBodyTracker. - The full skeleton, always. All 17 joints are placed every time, so joints the camera cannot see are the model's best guess. Their canvas projections land outside the frame's rectangle rather than disappearing, and there is no per-joint confidence. The 2D tracker does the opposite, because it drops what it cannot see.
It is a heavier neural model, so see Availability.
Body3D
var confidence: Double                      // 0…1
var height: Double                          // meters
var heightEstimation: HeightEstimation      // .reference or .measured
var distance: Double?                       // meters from the camera to the root
func has(_ joint: BodyJoint3D) -> Bool

// canvas: the overlay surface, like the other trackers
func point(_ joint: BodyJoint3D, in rect: Rectangle, mirrored: Bool = false) -> Vector2?
func points(in rect: Rectangle, mirrored: Bool = false) -> [BodyJoint3D: Vector2]
func bones(in rect: Rectangle, mirrored: Bool = false) -> [(Vector2, Vector2)]

// model space: meters, the pelvis root at the origin
func position(_ joint: BodyJoint3D) -> Vector3?
var positions: [BodyJoint3D: Vector3] { get }
func bones() -> [(Vector3, Vector3)]

// camera space: meters from the camera itself
func cameraRelativePosition(_ joint: BodyJoint3D) -> Vector3?

static let skeleton: [(BodyJoint3D, BodyJoint3D)]
Body3D is one person's pose, and you can read it in three spaces:
- Canvas.
point(_:in:),points(in:), andbones(in:)work exactly likeBody's. They give the joints projected onto the frame and mapped into the rectangle you drew it in, for skeleton overlays. - Model space.
position(_:),positions, and the no-argumentbones()give meters, with the pelvisrootat the origin. From there, x runs to the picture's right, y runs up, and z runs away from the camera. You can project it from any angle, because it is a real 3D figure. The front view is(x, y), the side view is(z, y), and the top view is(x, z), and no camera was at those angles. - Camera space.
cameraRelativePosition(_:)gives meters from the camera itself, with x right, y up, and z out in front of the lens. A joint's z is therefore how far away it is.distanceis a shortcut for the distance to the person's root.
The 17 BodyJoint3D joints run from head to ankles. They are topHead and centerHead, centerShoulder with the left and right shoulders, and the elbows and wrists. The list then continues with spine and root, and the hips, knees, and ankles. That is a different set from the 2D BodyJoint, with no eyes or ears. The 3D skeleton is built for the body in space rather than the face. height is the person's estimated height. A webcam gives no real depth data, so heightEstimation is .reference, which means the skeleton is scaled to a standard assumed height. It turns .measured when the image carried depth, as a LiDAR photo does.
if let body = tracker.body {
    for (a, b) in body.bones(in: rect) { drawLine(a, b) }     // over the feed
    for (a, b) in body.bones() {                              // from the side, in meters
        drawLine(center + Vector2(a.z, -a.y) * 200, center + Vector2(b.z, -b.y) * 200)
    }
}
PersonSegmenter
PersonSegmenter(_ source: any FrameSource, quality: Quality = .balanced)
var matte: Image? { get }
var cutout: Image? { get }
static func detect(in: Image, quality: Quality = .accurate) async throws -> Segmentation
PersonSegmenter separates the people from the rest of the frame. The pose trackers reduce a person to joints, while this one gives you their pixels. matte is a soft white silhouette of everyone in view, and its alpha is the per-pixel confidence. tint(_:) recolors it into a shadow, a glow, or a flat silhouette. cutout is the frame's own pixels with the background removed, ready to composite over anything the sketch draws. Both are plain Images, so draw them into the same rectangle as the frame and they sit exactly on the picture.
let camera = Camera()
lazy var people = PersonSegmenter(camera)
override func draw() {
    drawMyBackground()                        // anything, the replacement backdrop
    guard let rect = camera.fittedRectangle(in: bounds) else { return }
    if let cutout = people.cutout { drawImage(cutout, in: rect) }
}
quality trades matte resolution for speed: .fast for the lowest latency, .balanced (the live default), and .accurate for the finest edges (the still-image default). It is a neural model, so see Availability.
Each of the two images is converted only if your sketch reads it. The first read of matte or cutout turns its conversion on, so a sketch that reads only the matte never pays for the cutout. That first read can return nil once, and the next analyzed frame then publishes the image. The same applies to SubjectSegmenter below.
SubjectSegmenter
SubjectSegmenter(_ source: any FrameSource)
var matte: Image? { get }
var cutout: Image? { get }
var count: Int { get }
static func detect(in: Image) async throws -> Segmentation?
SubjectSegmenter lifts the salient subject out of the frame: the thing held up to the camera, or the object on the table. People count as subjects, but it is not limited to people. It gives the same matte and cutout pair as PersonSegmenter (all subjects combined), plus count, the number of distinct subjects the model found. While nothing stands out as foreground, matte and cutout are nil and count is 0. The still-image detect(in:) also returns nil when nothing stands out.
let camera = Camera()
lazy var subjects = SubjectSegmenter(camera)
override func draw() {
    tint(Color(white: 0.3))                                             // the room, dimmed
    guard let rect = drawFrame(camera) else { return noTint() }
    noTint()
    if let cutout = subjects.cutout { drawImage(cutout, in: rect) }     // the subject, lit
}
PointSegmenter
PointSegmenter(_ source: any FrameSource,
               imageEncoderAt: URL, promptEncoderAt: URL, maskDecoderAt: URL)
func pick(at: Vector2, in: Rectangle)        // start a fresh pick
func include(_: Vector2, in: Rectangle)      // the pick must also cover this
func exclude(_: Vector2, in: Rectangle)      // the pick must not cover this
func reset()                                 // drop the pick and its frozen frame
var pick: Pick? { get }                      // matte, cutout, confidence, bounds(in:)
var isPicking: Bool { get }
func detect(in: Image, at: [Vector2], avoiding: [Vector2] = []) async throws -> Pick?
A tracker that runs a model of its own throws VisionError.unavailable from a call made while the model will not load or run here, carrying the same sentence its unavailableReason holds, usually a missing or mismatched model file: a call in hand can throw, where a frame drawn without one can only read the property. VisionError.failed is the other case, a run that went through and could not produce its result. The depth tracker and the depth clip never throw; a model that answers wrongly lands in their unavailableReason.
PointSegmenter lifts whatever you point at. SubjectSegmenter decides for itself what stands out. This one takes direction: give it one point, and it segments the thing under that point, whatever that thing is. A click picks the mug, not the person holding it. The model is the small SAM 2.1, the promptable segmenter of Nikhila Ravi and colleagues from 2024, in three parts. Scripts/fetch-models.sh puts them in Models/ as SAM2_1SmallImageEncoderFLOAT16.mlpackage, SAM2_1SmallPromptEncoderFLOAT16.mlpackage, and SAM2_1SmallMaskDecoderFLOAT16.mlpackage, and they are never committed. Hand the three files to the initializer. Examples/Vision/PointLift runs the loop below, clicks and all.
pick(at:in:) takes the point in canvas coordinates and the rectangle the frame is drawn in, the same fittedRectangle(in:) you drew it into. It answers asynchronously. It freezes the current frame and encodes that frame once, which takes about 0.2 s, and then the mask decodes in milliseconds. pick keeps the previous answer until the new one arrives, and isPicking tells you one is on the way. A refinement reuses the frozen frame's encoding, so it also arrives in milliseconds. include(_:in:) adds a point the mask must also cover. exclude(_:in:) adds a point the mask must not cover, so a shift-click can remove a stray region. The model proposes three readings of every prompt (the part, the whole, and the group), and the best-scored one wins. Pick.confidence is that confidence.
Pick carries the same frame-aligned matte and cutout pair the other segmenters publish. It also carries bounds(in:), the picked thing's box mapped into the rectangle you name. The still-image detect(in:at:avoiding:) takes its points in image pixel coordinates, and it returns nil when the prompt matches nothing.
let camera = Camera()
lazy var picker = PointSegmenter(camera, imageEncoderAt: encoderURL,
                                 promptEncoderAt: promptURL, maskDecoderAt: decoderURL)
override func mousePressed() {
    guard let rect = camera.fittedRectangle(in: bounds) else { return }
    if modifiers.contains(.shift) {
        picker.exclude(Vector2(mouseX, mouseY), in: rect)
    } else {
        picker.pick(at: Vector2(mouseX, mouseY), in: rect)
    }
}
override func draw() {
    tint(Color(white: 0.3))
    guard let rect = drawFrame(camera) else { return noTint() }
    noTint()
    if let pick = picker.pick { drawImage(pick.cutout, in: rect) }   // the picked thing, lit
}
Segmentation
struct Segmentation {
    var matte: Image     // white silhouette, alpha = per-pixel confidence
    var cutout: Image    // the source's pixels where the matte is on
}
Segmentation is what the still-image detect(in:) calls return. It holds the same two images the live trackers publish as properties. The matte is at the model's resolution, so drawing it into the source's rectangle rescales it onto the picture. The cutout is at the source's own resolution.
RectangleDetector

RectangleDetector(_ source: any FrameSource, minAspectRatio: Float = 0.2,
                  maxAspectRatio: Float = 1.0, minSize: Float = 0.1,
                  minConfidence: Float = 0.6, maxCount: Int = 8)
var rectangles: [DetectedRectangle] { get }
static func detect(in: Image, …) async throws -> [DetectedRectangle]
RectangleDetector finds rectangular shapes and reports their four corners. A sheet of paper, a screen, a card, or a sign all count, even when seen at an angle. Unlike the pose and segmentation models, this is a classical detector with no ML, so it runs on any Mac. The aspect, size, and confidence parameters tune what counts as a rectangle.
let camera = Camera()
lazy var rects = RectangleDetector(camera)
override func draw() {
    if let frame = camera.frame { drawImage(frame, in: bounds) }
    noFill(); stroke(.green)
    for r in rects.rectangles { drawPolygon(r.corners(in: bounds)) }
}
A DetectedRectangle carries corners(in:), center(in:), bounds(in:), and a confidence. corners(in:) gives the four corners in perimeter order, ready to drawPolygon as a closed quad. bounds(in:) gives the axis-aligned box that contains them, ready to drawRect. The corners come back in perspective, which is what a document scanner uses to warp a page flat. The same type carries SaliencyTracker's salient regions. Those arrive upright, so bounds(in:) is the natural read there.
BarcodeScanner
BarcodeScanner(_ source: any FrameSource)
var barcodes: [DetectedBarcode] { get }
static func detect(in: Image) async throws -> [DetectedBarcode]
BarcodeScanner reads barcodes and QR codes and decodes their payload. It is also a classical detector, so it runs on any Mac. Point it at a QR code to bring a URL or a piece of text from the world into a sketch. That is a simple way to give a running piece some input.
let camera = Camera()
lazy var codes = BarcodeScanner(camera)
override func draw() {
    if let frame = camera.frame { drawImage(frame, in: bounds) }
    for code in codes.barcodes {
        drawPolygon(code.corners(in: bounds))
        if let payload = code.payload { drawText(payload, at: code.center(in: bounds)) }
    }
}
A DetectedBarcode carries a payload, a symbology, a confidence, and corners(in:) / center(in:) for where it is. The payload is the decoded text or URL, or nil. The symbology is a typed value, so compare it against .qr, .ean13, .code128, and the rest. A kind that Ollin does not name still arrives, under the name the system gives it.
TextRecognizer
TextRecognizer(_ source: any FrameSource, quality: Quality = .fast)
var lines: [DetectedText] { get }
var text: String { get }            // all lines joined
static func detect(in: Image, quality: Quality = .accurate) async throws -> [DetectedText]
TextRecognizer reads text from the feed with Apple's OCR, the same engine behind Live Text, so it covers the same languages. Each line comes back with its text and its position. quality trades speed for thoroughness: .fast keeps up with a live feed, while .accurate reads more and is the default for still images.
let camera = Camera()
lazy var reader = TextRecognizer(camera)
override func draw() {
    if let frame = camera.frame { drawImage(frame, in: bounds) }
    for line in reader.lines {
        drawRect(line.bounds(in: bounds))
        drawText(line.text, at: line.bounds(in: bounds).corner)
    }
}
A DetectedText carries its text, a confidence, and corners(in:) / bounds(in:) for where the line sits. reader.text joins every line into one block.
ObjectTracker
ObjectTracker(_ source: any FrameSource)
func track(_ region: Rectangle, in frameRect: Rectangle, mirrored: Bool = false)
func track(centeredAt: Vector2, size: Double, in frameRect: Rectangle, mirrored: Bool = false)
func track(normalized: Rectangle)
func stopTracking()
var trackedObject: TrackedObject? { get }
var isTracking: Bool { get }
static func track(_ seed: Rectangle, across: [Image]) async throws -> [TrackedObject]
The other trackers detect, which means they find faces or rectangles on their own. This one tracks instead. You hand it a box that says where something is right now, and it follows that same patch from frame to frame as it moves. So it can follow an object the recognizers have no model for. It is a classical tracker with no neural model, so it runs on any Mac.
Seed it from a click with track(centeredAt:size:in:), or from a box you drew with track(_:in:). Another detector's result works too, if you pass its bounds(in:). Then read trackedObject each frame. Call a track(…) method again to re-target, or stopTracking() to let go.
let camera = Camera()
lazy var tracker = ObjectTracker(camera)
var view = Rectangle(x: 0, y: 0, width: 1, height: 1)

override func draw() {
    guard let rect = drawFrame(camera) else { return }
    view = rect
    if let object = tracker.trackedObject {
        noFill(); stroke(.green)
        drawRect(object.bounds(in: view))
    }
}

override func mousePressed() {
    tracker.track(centeredAt: Vector2(mouseX, mouseY), size: 160, in: view)
}
The static track(_:across:) follows a patch through an ordered array of frames with no camera. That is the form for a recorded clip.
The ObjectTracking example locks onto whatever you click. With no camera it plays the bundled dance film and seeds the tracker from the dancer's face as FaceTracker finds it. From then on the tracker does the following.
TrackedObject
var confidence: Double { get }
func bounds(in: Rectangle, mirrored: Bool = false) -> Rectangle
func center(in: Rectangle, mirrored: Bool = false) -> Vector2
TrackedObject says where the tracked patch is now and how sure the tracker is. confidence stays high while the patch is clearly in view. It falls as the patch is hidden, leaves the frame, or moves too fast. That makes it a good value to fade an overlay by, and a good value to threshold on. When it drops below the threshold, treat the object as lost and call track(…) again to re-lock.
Read confidence to tell whether the patch is lost, since the box stays put when it is. Take a textured patch sixty-four pixels across, moving five pixels a frame through a 640 by 480 frame. The box stays about a pixel from it, under three at the worst frame of sixty, and the confidence stays near 0.9. When the patch slides out of the frame, the confidence falls over the frames its edge crosses out. It sits near 0.03 once the patch is gone, while the box stays where the patch was last seen.
TrajectoryTracker
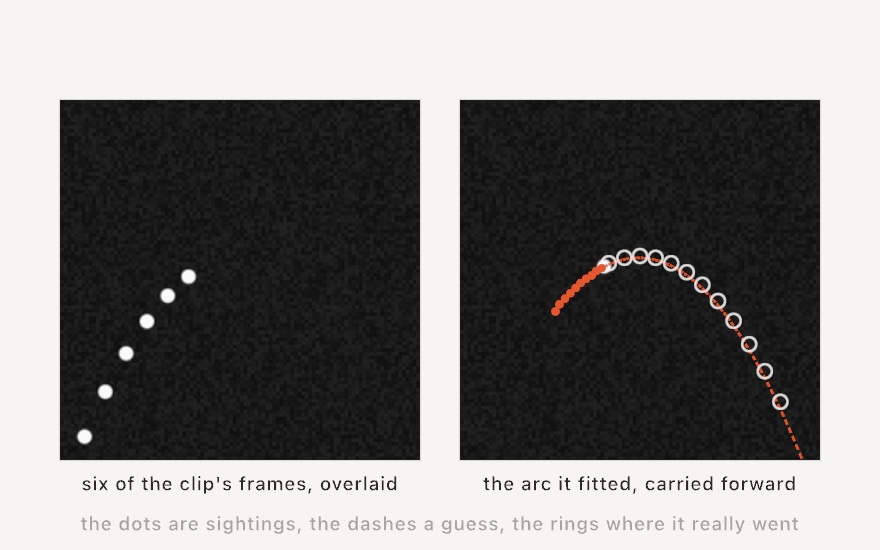
TrajectoryTracker(_ source: any FrameSource, minObservationCount: Int = 10,
                  minObjectRadius: Double? = nil, maxObjectRadius: Double? = nil)
var trajectories: [DetectedTrajectory] { get }
func reset()
static func detect(across: [Image], frameRate: Double = 30,
                   minObservationCount: Int = 10) async throws -> [[DetectedTrajectory]]
ObjectTracker follows a patch you point at. This one watches for ballistic motion on its own. Anything small that flies along a parabola comes back as a DetectedTrajectory, an arc of points with the fitted curve. A thrown ball and a bounce both count. It is classical, with no neural model, so it runs on any Mac. It needs two things. The camera must be held still, because a moving camera turns the whole scene into motion. It also needs a little time, because an arc is reported only once the object has been seen minObservationCount times.
let camera = Camera()
lazy var tracker = TrajectoryTracker(camera)

override func draw() {
    guard let view = drawFrame(camera) else { return }
    for arc in tracker.trajectories {
        stroke(Color(red: 0.35, green: 1, blue: 0.6, alpha: arc.confidence))
        drawPolyline(arc.projectedPoints(in: view))
    }
}
The optional radius bounds are fractions of the frame, 0…1, and they filter what counts as a moving object. Set maxObjectRadius to ignore large movers, like a person crossing the scene. Call reset() after the scene jumps (a video loop, a seek), so the jump is not read as motion. The static detect(across:frameRate:) finds the arcs in an ordered array of frames with no camera. The frames are a recorded clip's, paced at frameRate.
DetectedTrajectory
var id: UUID { get }
var confidence: Double { get }
func detectedPoints(in: Rectangle, mirrored: Bool = false) -> [Vector2]
func projectedPoints(in: Rectangle, mirrored: Bool = false) -> [Vector2]
var equationCoefficients: SIMD3<Double> { get }
var normalizedRadius: Double { get }
var timeRange: ClosedRange<Double>? { get }
DetectedTrajectory is one arc. detectedPoints(in:) is the path as observed: the raw sightings, in travel order. projectedPoints(in:) is the same span projected onto the fitted parabola. That is the smoothed path, and the better one to draw. The fit itself is equationCoefficients. In normalized space, with a lower-left origin, the curve is y = c.x·x² + c.y·x + c.z. You can sample it past the last point to predict where the arc is headed.
An arc keeps its id as more of it comes into view. Accumulate results by id to build trails that outlive any single frame's detection. Fade them by confidence, which says how sure the detector is that the points form one real trajectory.
FlowTracker

FlowTracker(_ source: any FrameSource, quality: Quality = .medium)
var field: MotionField? { get }
func reset()
static func detect(from previous: Image, to current: Image,
                 quality: Quality = .high) async throws -> MotionField?
static func detect(across: [Image], quality: Quality = .medium) async throws -> [MotionField?]
ObjectTracker follows one patch, and TrajectoryTracker finds arcs. This one measures all the motion. Optical flow is a dense field of vectors that describes how every part of the picture moved since the previous analyzed frame. Wave a hand, and the pixels under it get vectors. Pan the camera, and the whole field drifts together. It is classical, with no neural model, so it runs on any Mac.
Read field each frame, and sample it wherever you like. See MotionField. It is nil until the second analyzed frame, because flow needs a pair of frames. quality trades speed for a finer field, from .low through .medium and .high to .veryHigh. .medium keeps up with a live camera. Call reset() after the scene jumps (a video loop, a seek), so the jump is not read as one huge motion.
There are two camera-free forms. detect(from:to:) measures a single pair of stills. detect(across:) runs an ordered array of frames through the same frame-over-frame path the live tracker uses. Its first entry is nil, because flow needs a frame before it.
MotionField
func vector(at point: Vector2, in rect: Rectangle, mirrored: Bool = false) -> Vector2
func samples(in rect: Rectangle, every step: Double = 24, mirrored: Bool = false) -> [Sample]
func averageFlow(in rect: Rectangle, mirrored: Bool = false) -> Vector2
func flowNormalized(at point: Vector2) -> Vector2
var averageFlowNormalized: Vector2 { get }
var confidence: Double { get }
var size: Vector2 { get }
MotionField is the motion between the previous analyzed frame and this one, and you can query it anywhere. vector(at:in:) answers in canvas terms: which way is the picture moving under this point, and how far. It takes a canvas point and the rectangle you drew the frame into. It returns a canvas-space vector, so the result scales with how large you drew the frame. samples(in:every:) lays a regular grid of those vectors over the rectangle. Each one is a Sample with a position and the flow there, ready to draw as an arrow. averageFlow(in:) is the global drift. A camera pan reads as one shared direction, while localized motion mostly averages out.
let camera = Camera()
lazy var flow = FlowTracker(camera)

override func draw() {
    guard let view = drawFrame(camera) else { return }

    if let field = flow.field {
        stroke(.white)
        for s in field.samples(in: view, every: 36) {
            drawLine(s.position, s.position + s.flow * 3)
        }
    }
}
Every query reads from the underlying flow map, so the field can drive other work. Push particles by the vector under each one. You can also drive a physics world's forces from the motion in front of the camera, or steer a brush by averageFlow.
Two practical notes apply. First, magnitudes are conservative estimates, and the analysis interval varies with load. Treat them as a signal you scale by a gain of your own, not as a calibrated speed. Second, motion is only measurable where the picture has texture. A flat, featureless area, like a blank wall or a solid backdrop, does not read as zero motion. It reads as noise, because there is nothing to match from frame to frame. Do not treat stillness in a featureless region as real. If the scene is mostly flat, give it texture before you trust the field there. Even a faint static speckle behind the action is enough.
flowNormalized(at:) and averageFlowNormalized are the raw form, for working in normalized coordinates yourself. That space is 0…1 with a lower-left origin and +y up (see coordinate mapping). size is the flow map's resolution, and confidence is the tracker's confidence in the field as a whole.
MotionField lives in the core rather than in this library, so every source of motion reports the same value. A tethered iPhone measuring its own camera gives one too, through PhoneDevice.latestFlow, and a helper written against this tracker's field takes the phone's unchanged. A source of your own builds one with init(width:height:confidence:flowNormalized:), handing over the read from a normalized point to the motion there.
ImageClassifier
ImageClassifier(_ source: any FrameSource, minConfidence: Double = 0.1)
var classifications: [Classification] { get }
var topClassification: Classification? { get }
func confidence(of label: String) -> Double
static func detect(in: Image, minConfidence: Double = 0.1) async throws -> [Classification]
static func supportedLabels() -> [String]
ImageClassifier names what the picture shows ("sky", "people", "dog", "food") from a fixed vocabulary of about 1,300 everyday labels. Unlike the other trackers, it reports no positions. The result is what is in the frame and how confidently. That is the right shape for a sketch that reacts to its surroundings rather than overlaying them.
let camera = Camera()
lazy var classifier = ImageClassifier(camera)

override func draw() {
    drawFrame(camera)

    for (i, found) in classifier.classifications.prefix(5).enumerated() {
        drawText("\(found.name) \(Int(found.confidence * 100))%", 40, 60 + Double(i) * 32)
    }
}
classifications is everything at or above minConfidence, strongest first, and topClassification is the single strongest. The other way to read the result is by name. confidence(of: "dog") answers 0…1 for any label in the vocabulary, unfiltered, so a concept below the floor still reads its true, small value. That is the parameter-shaped form: "how much does this look like a plant" can drive a color, a speed, or a sound. Spaces work in place of underscores ("blue sky" finds blue_sky).
Two things about the vocabulary are worth knowing. It is hierarchical, so one clear subject also scores every broader label above it: a blue sky scores blue_sky, sky, and outdoor together. The classifier also scores all of the vocabulary every frame, mostly near zero. So minConfidence (default 0.1) is what keeps classifications down to the meaningful few. supportedLabels() lists the full vocabulary when you want to browse for a concept to key on.
The model is neural, so the availability surface applies (isAvailable / unavailableReason).
Classification
var label: String { get }       // "blue_sky", the identifier
var confidence: Double { get }  // 0…1
var name: String { get }        // "blue sky", ready to draw
Classification is one label the classifier saw. label is the underscored identifier the vocabulary uses, and the one confidence(of:) and supportedLabels() speak. name replaces the underscores with spaces, ready for display.
SaliencyTracker

SaliencyTracker(_ source: any FrameSource, mode: Mode = .attention)
var heatMap: Image? { get }
var regions: [DetectedRectangle] { get }
func salience(at: Vector2, in: Rectangle, mirrored: Bool = false) -> Double
static func detect(in: Image, mode: Mode = .attention) async throws -> Saliency?
SaliencyTracker maps what draws the eye. It gives a heat map of visual salience over the frame, plus the bounding regions where the salience peaks. The segmenters answer "which pixels are the subject". This answers "which parts of the picture matter", for any content. mode picks one of two kinds. .attention (the default) predicts where a person would look. It is trained on human gaze, so it is drawn to faces and contrast. .objectness highlights regions likely to contain discrete objects, whether or not they draw the eye. The mode is fixed at init, so make one tracker per mode to read both.
let camera = Camera()
lazy var saliency = SaliencyTracker(camera)

override func draw() {
    guard let rect = drawFrame(camera) else { return }
    if let heat = saliency.heatMap {
        tint(Color(red: 1, green: 0.6, blue: 0.1, alpha: 0.7))
        drawImage(heat, in: rect)                     // attention as a warm glow
        noTint()
    }
    for region in saliency.regions {
        noFill(); stroke(.white)
        drawRect(region.bounds(in: rect))             // the salient spots, boxed
    }
}
heatMap is a white-alpha image like the segmentation matte, and its alpha is the salience. tint(_:) recolors it into a glow, a fog, or an inverted spotlight. It comes back at the model's own coarse resolution, 68×68, whatever the source's size or aspect. Drawing it into the frame's rectangle stretches it smoothly onto the picture. Like the segmenters' images, it is converted only once a read has turned that on. So the first read can return nil, and the next analyzed frame then publishes it. regions are the salient bounding boxes (usually a handful at most) as DetectedRectangles. They are upright here, so bounds(in:) is the natural read.
The third surface is a query. salience(at:in:) answers "how salient is the picture under this canvas point" (0…1) straight from the latest result, with no image in between. That is the field-shaped form. It can be a density for stippling or hatching, an attractor for particles, or a weight for where to spend detail. Pass the same rectangle you drew the frame into (and mirrored: if you drew it flipped). Out-of-range points clamp to the edge. salienceNormalized(at:) is the raw normalized-space form.
The model is neural, so the availability surface applies (isAvailable / unavailableReason).
Saliency
struct Saliency {
    var heatMap: Image                 // white, alpha = salience
    var regions: [DetectedRectangle]   // the salient bounding boxes
    func salience(at: Vector2, in: Rectangle, mirrored: Bool = false) -> Double
    func salienceNormalized(at: Vector2) -> Double
}
Saliency is what the still-image detect(in:mode:) returns: the same three surfaces the live tracker publishes, as one value. A heat map the system will not convert throws VisionError.failed rather than coming back as nothing.
ConceptTracker
ConceptTracker(_ source: any FrameSource,
               imageModelAt: URL, textModelAt: URL, vocabularyAt: URL,
               concepts: [String] = [])
ConceptTracker(imageModelAt: URL, textModelAt: URL, vocabularyAt: URL,
               concepts: [String] = [])       // bound to no source; still images only
var concepts: [String] { get set }            // the phrases being scored
var classifications: [Classification] { get } // shares over the concepts, strongest first
var topClassification: Classification? { get }
func share(of phrase: String) -> Double       // one phrase's share, 0…1
func similarity(of phrase: String) -> Double  // the raw cosine, unshared
var imageEmbedding: [Double]? { get }         // the frame as a unit vector
func embedding(of phrase: String) async throws -> [Double]
func detect(in image: Image) async throws -> [Classification]
var isLoaded: Bool { get }
ConceptTracker scores any phrases you type against the picture. It reads like ImageClassifier, but the vocabulary is yours. Give it concepts in plain language, and read how strongly each one applies, every frame.
let camera = Camera()
lazy var ideas = ConceptTracker(camera,
    imageModelAt: URL(fileURLWithPath: "Models/mobileclip_s0_image.mlpackage"),
    textModelAt: URL(fileURLWithPath: "Models/mobileclip_s0_text.mlpackage"),
    vocabularyAt: URL(fileURLWithPath: "Models/bpe_simple_vocab_16e6.txt"),
    concepts: ["a spooky scene", "a cheerful scene"])

override func draw() {
    let spooky = ideas.share(of: "a spooky scene")        // 0…1, updates each frame
}
The model is MobileCLIP-S0, Apple's small contrastive image-text model from 2024, by Pavan Kumar Anasosalu Vasu and colleagues, in two halves. An image encoder runs over the frames, and a text encoder embeds each phrase once. The text result is cached, so a fixed concept set costs one text run per phrase, ever. Both encoders land in one shared space, and a score says how close the picture sits to the phrase. Scripts/fetch-models.sh downloads the three files into Models/, and they are never committed. The TugOfWords example shows the whole flow, including the missing-files notice. It wires two phrase parameters to a tug-of-war rope, and each phrase is editable in the inspector while the sketch runs.
The scoring follows the recipe of CLIP, by Alec Radford and colleagues, from 2021. The scores are relative to the concept set: they are the phrases' shares of the picture, and they sum to 1. A single phrase on its own always reads 1, so provide contrasts to get meaningful scores. For example, "How spooky does the room look" is the spooky phrase's share against a cheerful one. similarity(of:) is the raw cosine instead, for mapping the space yourself. Matching pairs typically land around 0.2 to 0.4.
Phrases can change while the sketch runs. Set concepts, or query share(of:) with a phrase it has not seen. The new phrase joins the set and reads 0 until its text encoding completes, within one or two frames. imageEmbedding and embedding(of:) expose the unit vectors under the scores, and you compare them with a dot product. Loading and availability behave like ModelTracker. The first-ever load specializes the models for this Mac and can take several seconds. isLoaded flips when they are ready, and a missing file surfaces through unavailableReason.
ModelTracker
ModelTracker(_ source: any FrameSource, modelAt: URL)
ModelTracker(_ source: any FrameSource, model: MLModel)   // a model you configured yourself
ModelTracker(modelAt: URL)                                // bound to no source; still images only
var classifications: [Classification] { get }             // classifier outputs, strongest first
var topClassification: Classification? { get }
func confidence(of: String) -> Double
var objects: [Detection] { get }                     // object-detector outputs
var map: Image? { get }                                   // image-typed output, white-alpha
var image: Image? { get }                           // image-typed output, full color
var classMask: ClassMask? { get }                         // semantic-segmenter output
func value(at: Vector2, in: Rectangle, mirrored: Bool = false) -> Double
var isLoaded: Bool { get }
func detect(in: Image) async throws -> ModelOutput
ModelTracker runs your own Core ML model over the frames. It is the open end of the tracker catalog, because any model you convert to Core ML works with it. That means an .mlpackage or .mlmodel you converted yourself, or an already-compiled .mlmodelc. Another source is Apple's model gallery, and most published models convert with coremltools. Core ML schedules the work across the CPU, GPU, and Neural Engine on its own. On Apple silicon, a typical vision model runs mostly on the Neural Engine.
A model fills the surfaces that match what it outputs, decoded the same way the built-in trackers decode theirs:
- Classifier (label + confidence outputs) →
classifications/topClassification/confidence(of:), likeImageClassifierbut over your model's own vocabulary. - Image-to-image (a depth estimator, a custom matte, a style-transfer model) → two readings of the same output.
mapis the output as a value field: a white-alphaImagelike the segmentation matte.tint(_:)recolors it, and drawing it into the frame's rectangle stretches it onto the picture.value(at:in:)gives the value under any canvas point, the same field-shaped query thatSaliencyTrackeroffers. It answers0…1, and out-of-range points clamp to the edge.imageis the output as a picture, in full color, for a model that paints rather than measures. A style-transfer model's stylized frame draws as any image would (theStyleMirrorexample). Each surface converts only once something reads it, so a sketch pays only for the reading it uses. - Object detector (a detector exported with its non-maximum-suppression head, the form Apple's gallery ships) →
objects, labeled boxes thatbounds(in:)maps onto the canvas. - Semantic segmenter (a model whose output is a plane of class indices, one per pixel, the DeepLabV3 form) →
classMask, aClassMask. A class mask reads three ways. It says which classes are in frame and how much of the picture they fill. It gives the class under any canvas point. And it hands over each class as a drawable, tintable mask. The model's own vocabulary comes along when it declares one, as Apple's gallery models do.
let camera = Camera()
lazy var depth = ModelTracker(camera, modelAt: URL(fileURLWithPath:
    "Models/DepthAnythingV2SmallF16.mlpackage"))

override func draw() {
    guard let rect = drawFrame(camera) else { return }
    let near = depth.value(at: Vector2(mouseX, mouseY), in: rect)   // 0 far … 1 near
    if let map = depth.map { drawImage(map, in: rect) }             // the depth map, tintable
}
The model in the block is the small Depth Anything V2, by Lihe Yang and colleagues, from 2024. Each of the four surfaces has an example. DigitReader reads the classifier surface, DepthRelief the map, ObjectDetection the objects, and PaintByClass the class mask.
Loading happens in the background, off the frame loop. It starts with the first analyzed frame (or the first detect(in:)). isLoaded flips when the model is ready. Until then, frames pass by, so the source's other trackers are not stalled behind it. The compiled model is cached at a stable path. The path matters because Core ML specializes a model for this Mac's compute device. Core ML keys that work to the compiled files and the executable that loads them. So the first launch of a (re)built sketch takes several seconds, while every later launch of the same build starts in milliseconds. A model file that is missing or will not load surfaces through the availability pair instead of failing silently. So check the pair, and tell the user what to do. The DepthRelief example points at its download script.
Model weights are yours to bring, because Ollin bundles none. The examples fetch theirs with Scripts/fetch-models.sh, and the repo ignores Models/. A file already in place is skipped, and --force fetches it again. The examples write the plain Models/ path, which resolves when a sketch is launched from the top folder of the repository. A sketch that lives elsewhere finds the folder with sketchResource. It walks up from the sketch's own source file to the nearest Models folder and answers the file's path, or nil when there is none. That path holds wherever the sketch is launched from, and URL(fileURLWithPath:) wraps it for the initializers on this page. Besides the three parts PointSegmenter needs and the pair ConceptTracker needs, the script downloads Apple's official conversions of four models and builds a fifth:
- Depth Anything V2 (small). Apache-2.0, about 50 MB, for the
DepthReliefexample. - YOLOv3-tiny. YOLO License v2, about 18 MB, for
ObjectDetection. - The MNIST drawing classifier. MIT, about 400 KB, for
DigitReader, which points the model at the sketch's own pixels, with no camera anywhere. - DeepLabV3. Apache-2.0, about 4 MB, for
PaintByClass, the class-mask surface. - Video Depth Anything (small). Apache-2.0, about 55 MB, for
DepthTrackerand theDepthContoursexample. Nobody publishes a Core ML version, so the script builds this one on your Mac. That is a one-time Python step of a few minutes.
The StyleMirror example's model is not fetched at all. You train it yourself from any style image in a couple of minutes with swift Scripts/train-style-model.swift <image>. The CreateML framework does the training, because the Create ML app no longer offers its Style Transfer template. The weights are therefore your own work, with no license to check.
ModelOutput
struct ModelOutput {
    var classifications: [Classification]  // classifier outputs, strongest first
    var objects: [Detection]    // detector outputs
    var map: Image?                  // image-typed output, white-alpha
    var image: Image?          // image-typed output, full color
    var classMask: ClassMask?        // semantic-segmenter output
    func value(at: Vector2, in: Rectangle, mirrored: Bool = false) -> Double
    func valueNormalized(at: Vector2) -> Double
}

struct Detection {
    var label: String                // what the model says it is
    var confidence: Double           // 0…1
    func bounds(in: Rectangle, mirrored: Bool = false) -> Rectangle
    func center(in: Rectangle, mirrored: Bool = false) -> Vector2
}
ModelOutput is what the still-image detect(in:) returns: the same surfaces the live tracker publishes, as one value. Detection is one thing an object-detection model found. It carries a label, a confidence, and a box, and the usual in: helpers map the box onto the canvas.
ClassMask
var labels: [String] { get }                 // the model's class vocabulary, by index
var presentClassIndices: [Int] { get }            // classes in frame, largest first
var presentLabels: [String] { get }          // the same, by name
func coverage(of label: String) -> Double            // fraction of the picture, 0…1
func coverage(ofClass index: Int) -> Double
func classIndex(at: Vector2, in: Rectangle, mirrored: Bool = false) -> Int
func label(at: Vector2, in: Rectangle, mirrored: Bool = false) -> String?
func classIndexNormalized(at: Vector2) -> Int
func mask(of label: String) -> Image?        // one class as a white-alpha mask
func mask(ofClass index: Int) -> Image?
ClassMask is what a semantic-segmentation model labeled, pixel by pixel, in three readings of one plane.
- What's in frame.
presentClassIndices/presentLabelslist the classes in frame, largest first, andcoverage(of:)gives the share of the picture a class fills. - What's under a point.
classIndex(at:in:)/label(at:in:)give the class under any canvas point. Out-of-range points clamp to the edge, and you pass the rectangle you drew the frame into, like everyin:helper. - One class as pixels.
mask(of: "person")is white where the picture is that class and transparent elsewhere, like the segmentation matte. Draw it into the frame's rectangle and it lands on the picture, andtint(_:)recolors it.
A mask returns nil for a class that is not in frame. Masks are memoized per result, so drawing the same class every frame costs one conversion per analyzed frame.
labels is the vocabulary the model declares about itself, like DeepLabV3's 21 PASCAL VOC classes with "background" first. When the model declares no vocabulary, the index-based reads still work. The plane is at the model's own resolution (DeepLabV3 answers 513×513 whatever it watched), and it covers the full frame. Class indices above 255 cannot be represented on this surface.
lazy var segmenter = ModelTracker(camera, modelAt: URL(fileURLWithPath:
    "Models/DeepLabV3FP16.mlmodel"))

override func draw() {
    guard let rect = drawFrame(camera) else { return }
    if let classes = segmenter.classMask,
       let person = classes.mask(of: "person") {
        tint(.red)                        // the person's pixels, as paint
        drawImage(person, in: rect)
        noTint()
    }
}
DepthTracker
DepthTracker(_ source: any FrameSource, modelAt: URL)
var map: Image? { get }                                   // depth, white-alpha, 0 far … 1 near
func value(at: Vector2, in: Rectangle, mirrored: Bool = false) -> Double
var sourceFrame: Image? { get }                           // the frame the map was read from
var range: ClosedRange<Double>? { get }                   // the model values read as 0 and 1
var analyzedFrames: Int { get }
func reset()                                              // a new session on the next frame
var isLoaded: Bool { get }
DepthTracker gives depth that holds still. A single-image depth model decides each frame on its own, and that is the model ModelTracker runs in the DepthRelief example. Under that model, a still scene can shimmer, and a slow move can wobble. DepthTracker runs a video depth model instead, the small Video Depth Anything, by Sili Chen and colleagues, from 2025. It keeps a cache of the frames it has seen, about a second of them, and reads each new frame against that cache. The map then moves with the scene and with nothing else.
The surface is the one ModelTracker gives a depth model, so a sketch swaps one for the other in a line. map is the depth as a white-alpha Image, 0 far to 1 near, sized to the model's output. Draw it into the frame's rectangle and it lines up. value(at:in:) answers under any canvas point, in the same 0…1. The frame the map was read from is sourceFrame, and it stays in step with the map. So you can draw it under an overlay with no lag between the two.
let camera = Camera()
lazy var depth = DepthTracker(camera, modelAt: URL(fileURLWithPath:
    "Models/VideoDepthAnythingSmallF16.mlpackage"))

override func draw() {
    guard let rect = drawFrame(camera) else { return }
    let near = depth.value(at: Vector2(mouseX, mouseY), in: rect)   // 0 far … 1 near
    if let map = depth.map { drawImage(map, in: rect) }
}

override func keyPressed() {
    if key == "r" { depth.reset() }   // a new scene: anchor the depth again
}
Two things are particular to it. The first is that the depth is relative: nearer and farther, not meters. The model keeps that scale consistent across a session by anchoring on the first frame it sees. reset() is for a camera that moved to another room, or a clip that started over, and the next frame then becomes the new anchor. The second is that the values you read pass through a range that follows the scene slowly. range tells you which of the model's own values currently read as 0 and 1. It expands at once when something nearer or farther than anything so far appears, and it eases back over a few seconds. So the picture never re-scales between two frames. The reading also settles over its first second, as the model's window fills with frames.
The model runs on the GPU, at about 70 ms a frame on an M2. So a sketch gets about fourteen depth readings a second, while the picture keeps its own frame rate. Frames are read squashed to the model's landscape input, so a portrait source is analyzed a little stretched. There is no still-image mode, because a video model has nothing to say about one picture, and ModelTracker covers that case.
The model is not downloaded but built. Nobody publishes a Core ML version of it, so Scripts/fetch-models.sh makes one on your Mac from the published checkpoint. That is a one-time step of a few minutes, and it needs a Python from 3.10 to 3.13 (brew install python@3.13). The converter, Scripts/convert-video-depth.py, checks its work against the upstream code before it writes the package. The small checkpoint is Apache-2.0. The larger ones are licensed for non-commercial use only, so the script never fetches them. The converter accepts them by hand, for work of your own under those terms. Loading and availability behave like ModelTracker's, and the model needs Apple silicon. Examples/Vision/DepthContours draws the depth as contour lines. A parameter swaps in the single-image model, so you can watch the lines crawl and then hold still.
DepthClip
DepthClip(_ playback: any ClipPlayback, modelAt: URL)   // anything with a currentTime and a duration
DepthClip(url: URL, modelAt: URL)                        // a file, read by time
var isReady: Bool { get }
var progress: Double { get }                              // 0…1 while the pass runs
var map: Image? { get }                                   // the frame under the playhead
func map(at seconds: Double) -> Image?
func value(at: Vector2, in: Rectangle, mirrored: Bool = false) -> Double
func value(at: Vector2, in: Rectangle, time: Double, mirrored: Bool = false) -> Double
var range: ClosedRange<Double>? { get }                   // the model values read as 0 and 1
var frameCount: Int { get }
var isAvailable: Bool { get }
var unavailableReason: String? { get }
DepthClip is the whole clip's depth, read ahead of time. DepthTracker reads a feed as it plays, but a recording can be read whole instead. DepthClip runs the video depth model the way it was trained to be read, in windows of 32 frames. Each window is fitted to the one before it on the frames they share, and the overlap between them is blended. That is the model's published inference. The result is kept on disk and answered by clip time.
Bind it to a VideoPlayer, and map and value(at:in:) answer for the frame under the playhead. They match DepthTracker's, so a sketch swaps one for the other in one line. map(at:) and value(at:in:time:) answer for any second of the clip.
let player: VideoPlayer
var depth: DepthClip?

override func setup() {
    player.play()
    depth = DepthClip(player, modelAt: URL(fileURLWithPath:
        "Models/VideoDepthAnythingSmallClipF16.mlpackage"))
}

override func draw() {
    guard let rect = drawFrame(player), let depth else { return }
    if !depth.isReady { return drawStatus("Reading the clip's depth… \(Int(depth.progress * 100))%") }
    if let map = depth.map { drawImage(map, in: rect) }
}
The pass runs once, in the background, at a second or two a window on an M2. So a 30-second clip takes about a minute. progress counts it up, and isReady flips when every frame is there. The result is cached under ~/Library/Caches/Ollin/DepthClips, keyed on the clip and the model, so the next run opens at once.
Two things are particular to it. The first is the export. A DepthTracker on a player reads each frame as the export reaches it, one at a time, the way it reads a live feed. DepthClip reads the whole file instead, in the windows the model was trained on. Under --export-video, the pass runs before the first frame renders, and frame k always carries the map of the clip frame it shows. Create it by the end of setup(), as a stored property, so the export finds it. The second is the scale. The depth is relative, nearer and farther, on one scale for the whole clip. range names the model values that read as 0 and 1: the first and ninety-ninth percentiles over every frame. It never moves, so nothing re-scales as the clip plays.
The pass is checked against the published inference. The converter writes the upstream pass over a fixed clip beside the package, and the tests compare the Swift pass to it. Frames are read squashed to the model's landscape input, as DepthTracker reads them. Scripts/fetch-models.sh builds the package beside the streaming one, in the same one-time Python step, and the model needs Apple silicon. Examples/Vision/FootageDepth draws a clip's depth as contour lines, with the pass counting up the first time. Its clip is the bundled footage of the Voladores de Papantla, flyers circling down a pole on ropes.
Coordinate mapping
The recognizers report geometry in normalized coordinates. That is 0…1 across the frame, with the origin at the lower-left and y pointing up. It is the convention Apple's Vision framework uses. Ollin's canvas is the opposite: pixels, with the origin at the top-left and y pointing down. So a result has to be flipped in y and scaled to wherever the frame was drawn.

Every result also keeps what the recognizer said, under a name ending in Normalized: Face.boundingBoxNormalized, TrackedObject.boundingBoxNormalized, and a trajectory's detectedPointsNormalized and projectedPointsNormalized. Reach for those when the mapping is your own, and for the helpers otherwise. The Face helpers (bounds(in:), landmarks(_:in:)) do this for you. Pass the rectangle you drew the frame into, usually camera.fittedRectangle(in: bounds), so the overlay sits on the picture. Set mirrored: true when you draw the frame flipped left to right, so the overlay flips with it. That is the natural "selfie" orientation for a front camera.
To map points from a source the built-in trackers do not cover (say, a custom Core ML model), VisionSpace exposes the same math directly:
VisionSpace.point(_ x: Double, _ y: Double, in: Rectangle, mirrored: Bool = false) -> Vector2
VisionSpace.rectangle(_ normalized: Rectangle, in: Rectangle, mirrored: Bool = false) -> Rectangle
VisionSpace.fittedRectangle(imageSize: Vector2, in container: Rectangle) -> Rectangle
The inverse goes the other way. It takes a point or a box you drew in canvas space back to normalized coordinates. That is how ObjectTracker is seeded from where something sits on the canvas:
VisionSpace.normalizedPoint(_ canvasPoint: Vector2, in: Rectangle, mirrored: Bool = false) -> Vector2
VisionSpace.normalizedRectangle(_ canvasRect: Rectangle, in: Rectangle, mirrored: Bool = false) -> Rectangle
Still images
Every tracker also runs once on an image you loaded, with no camera needed. That is useful for analyzing photos, and it is how the framework tests detection:
let image = try loadImage("crowd.jpg")
let found = try await FaceTracker.detect(in: image)
print("\(found.count) faces")
The trackers that work across frames are the exception, because one frame is not enough for them. Their camera-free forms take more than one. ObjectTracker.track(seed, across: frames) and TrajectoryTracker.detect(across: frames) take an ordered sequence. FlowTracker.detect(from:to:) takes the pair of stills to measure between, and detect(across:) handles a sequence.
Every one of these calls is async, which is fine inside a Task. But setup() is not async, and a deterministic render (a figure or an export) cannot wait a few frames for a result to arrive. waitFor runs the call inline and blocks until it is done:
let shapes = try waitFor(image) { try await ContourDetector.detect(in: $0) }
let field  = try waitFor(before, after) { try await FlowTracker.detect(from: $0, to: $1) }
let arcs   = try waitFor(frames) { try await TrajectoryTracker.detect(across: $0) }
Pass the image as the argument rather than capturing it, because the argument is what carries it into the analysis task safely. A pair or a sequence goes the same way. waitFor parks the calling thread, so never call it from an async context. Use await there instead. A live sketch usually needs neither of them, so start a Task, store its result in a property, and keep drawing until detection lands.
That parking also turns one small mistake into a hang with nothing printed. The mistake is reading a property of your sketch from inside the closure. A sketch is main-actor isolated, and its stored and static properties are too. A read from the closure waits for the main thread, and that is the thread already parked. Read the values you need into locals first, and let the closure capture those.
let floor = minimumScore              // a property of the sketch, read out here
let labels = try waitFor(image) {
    try await ImageClassifier.detect(in: $0, minConfidence: floor)
}
Availability
Some Vision models, body pose especially, need a compute device (a Neural Engine or a capable GPU) that not every Mac has. On a Mac without one, the model cannot run. Rather than silently reporting nothing, the tracker tells you. drawStatus turns the reason into the standard on-canvas notice:
if let reason = bodies.unavailableReason {
    return drawStatus(reason, style: .warning)
}
isAvailable is false only when the model genuinely cannot run here, so a transient error does not flip it. unavailableReason is a short human-readable explanation. The tracker also logs the reason once to the console. Every tracker exposes the pair through the VisionAvailability protocol. So a helper of your own can take any VisionAvailability and report for whichever tracker it is handed. Face, hands, and contours run on nearly any Mac, while body pose, segmentation, and the heavier models want Apple silicon.
Permission
Using the camera needs the user's permission, and start() requests it the first time it runs. Until the user grants it, frame stays nil and the trackers report nothing. From swift run, the system prompts on first use. A packaged app should include a camera-usage description (NSCameraUsageDescription).